一、PXE 概述
1.1 计算机操作系统(Linux)安装概述
- Linux 系统安装的三种引导方式
- Linux 系统安装过程
- 加载 boot loader
- 加载启动安装菜单
- 加载内核和initrd系统
- 加载根系统
- 运行其它的安装向导(如:anaconda、java 等等)
- Linux 安装光盘(CD/ISO)的安装相关文件
 1
 2
 3
 4
 5
 6
 7
 8
 9
10
11
12
13
14
15
16
17
18
19
20
|
[root@master Debain12.6]# ll
总用量 136
dr-xr-xr-x 3 root root    18 8月  28 13:29 boot
dr-xr-xr-x 2 root root    56 8月  28 13:29 css
lrwxrwxrwx 1 root root     1 8月  28 13:29 debian -> .
dr-xr-xr-x 3 root root    36 8月  28 13:29 dists
dr-xr-xr-x 4 root root  4096 8月  28 13:29 doc
dr-xr-xr-x 4 root root    32 8月  28 13:29 EFI
dr-xr-xr-x 3 root root  4096 8月  28 13:29 firmware
dr-xr-xr-x 2 root root     6 8月  28 13:29 install
dr-xr-xr-x 4 root root    60 8月  28 13:29 install.amd
dr-xr-xr-x 2 root root  4096 8月  28 13:29 isolinux
-r--r--r-- 1 root root 86062 8月  28 13:29 md5sum.txt
dr-xr-xr-x 2 root root  4096 8月  28 13:29 pics
dr-xr-xr-x 5 root root    58 8月  28 13:29 pool
-r--r--r-- 1 root root  8806 8月  28 13:29 README.html
-r--r--r-- 1 root root   291 8月  28 13:29 README.mirrors.html
-r--r--r-- 1 root root    86 8月  28 13:29 README.mirrors.txt
-r--r--r-- 1 root root   543 8月  28 13:29 README.source
-r--r--r-- 1 root root  5402 8月  28 13:29 README.txt
|
在系统光盘(CD/ISO)的 isolinux 目录下有和安装相关的文件:
 1
 2
 3
 4
 5
 6
 7
 8
 9
10
11
12
13
14
15
16
17
18
19
20
21
22
23
24
25
26
27
28
29
30
31
|
[root@master Debain12.6]# ll isolinux/
总用量 1128
-r--r--r-- 1 root root    338 8月  28 13:29 addrk.cfg
-r--r--r-- 1 root root    402 8月  28 13:29 addrkgtk.cfg
-r--r--r-- 1 root root    369 8月  28 13:29 adgtk.cfg
-r--r--r-- 1 root root    592 8月  28 13:29 adspkgtk.cfg
-r--r--r-- 1 root root   2048 8月  28 13:29 boot.cat
-r--r--r-- 1 root root    170 8月  28 13:29 drk.cfg
-r--r--r-- 1 root root    190 8月  28 13:29 drkgtk.cfg
-r--r--r-- 1 root root    816 8月  28 13:29 drkmenu.cfg
-r--r--r-- 1 root root     53 8月  28 13:29 exithelp.cfg
-r--r--r-- 1 root root 185905 8月  28 13:29 g2ldr
-r--r--r-- 1 root root   8192 8月  28 13:29 g2ldr.mbr
-r--r--r-- 1 root root    171 8月  28 13:29 gtk.cfg
-r--r--r-- 1 root root  38912 8月  28 13:29 isolinux.bin
-r--r--r-- 1 root root    157 8月  28 13:29 isolinux.cfg
-r--r--r-- 1 root root 119524 8月  28 13:29 ldlinux.c32
-r--r--r-- 1 root root 169552 8月  28 13:29 libcom32.c32
-r--r--r-- 1 root root  23524 8月  28 13:29 libutil.c32
-r--r--r-- 1 root root   1189 8月  28 13:29 menu.cfg
-r--r--r-- 1 root root    175 8月  28 13:29 prompt.cfg
-r--r--r-- 1 root root    158 8月  28 13:29 rqdrk.cfg
-r--r--r-- 1 root root    174 8月  28 13:29 rqdrkgtk.cfg
-r--r--r-- 1 root root    160 8月  28 13:29 rqgtk.cfg
-r--r--r-- 1 root root    177 8月  28 13:29 rqspkgtk.cfg
-r--r--r-- 1 root root 369433 8月  28 13:29 setup.exe
-r--r--r-- 1 root root    409 8月  28 13:29 spkgtk.cfg
-r--r--r-- 1 root root  59606 8月  28 13:29 splash.png
-r--r--r-- 1 root root    734 8月  28 13:29 stdmenu.cfg
-r--r--r-- 1 root root  26744 8月  28 13:29 vesamenu.c32
-r--r--r-- 1 root root    217 8月  28 13:29 win32-loader.ini
|
- boot.cat: 相当于grub的第一阶段
- initrd.img:ramfs文件(精简版的linux系统,文件系统驱动等)
- isolinux.bin:光盘引导程序,在mkisofs的选项中需要明确给出文件路径,这个文件属于SYSLINUX项目
- isolinux.cfg:启动菜单的配置文件,当光盘启动后(即运行isolinux.bin),会自动去找isolinux.cfg文件
- memtest:内存检测程序
- splash.png:光盘启动菜单界面的背景图
- vesamenu.c32:是光盘启动后的启动菜单图形界面,也属于SYSLINUX项目,menu.c32提供纯文本的菜单
- vmlinuz:是内核映像
1.2 PXE 预启动执行环境简介
PXE(Preboot eXecution Environment)预启动执行环境 是由Inter公司开发的计算机网络引导技术,它工作在 Server/Client 模式下,允许客户主机通从网络服务器下载引导镜像,并加载安装文件来安装计算机操作系统。
PXE 还提供了一种使用网络接口(Network Interface)启动计算机的机制。这种机制让计算机的启动可以不依赖本地数据存储设备(如硬盘)或本地已安装的操作系统。
严格来说,PXE 并不是一种安装方式,而是一种引导方式。
1.3 PXE服务的优点
- 规模化:同时装配多台服务器,无需每一台单独安装操作系统;
- 自动化:实现服务器的自动安装及自动配置各种服务;
- 远程实现:不需要光盘、U盘等安装介质,方便快捷的同时又可以保障服务器安全。
1.4 PXE装机需要的四大文件
- pxelinux.0:引导程序(来自syslinux程序)
- pxelinux.cfg/default :引导程序的配置文件(位于 /var/lib/tftpboot/ 下,需要手写,可参考光盘 isolinux 目录下的 isolinux.cfg 文件)
- vmlinuz:内核文件(从光盘中获取,位于 isolinux 目录下)
- initrd.img: 系统启动镜像文件(从光盘中获取,位于 isolinux 目录下)
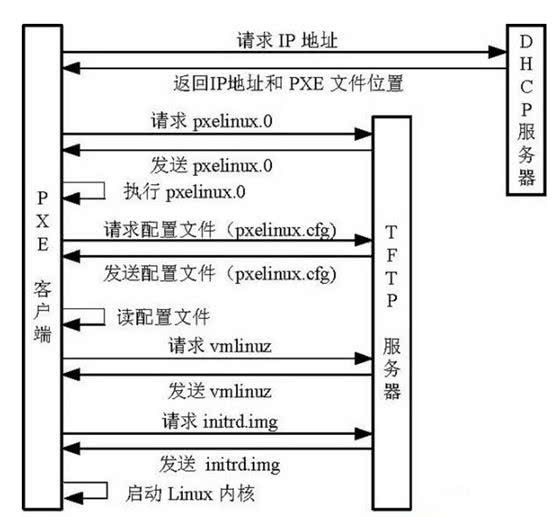
1.5 PXE的工作原理流程主要分为如下几步
- PXE Client(待安装操作系统的主机) 向DHCP发送请求
主机通电后,PXE Client 从自己的PXE网卡启动,通过PXE BootROM(自启动芯片)会以UDP协议发送一个广播请求,向本网络中的DHCP服务器索取IP。
- DHCP服务器相应 PXE Client 广播请求
DHCP服务器收到客户端的请求,验证是否是合法的PXE Client的请求,验证通过后将给客户端一个 offer响应报文,这个 offer报文 中包含了HDCP为客户端分配的IP地址、pxelinux启动程序(在TFTP中的)位置,以及配置文件所在位置。
- PXE客户端请求下载启动文件
PXE Client 收到服务器的offer报文 后,会回应一个帧,以请求传送启动所需文件。这些文件包括:pxelinux.0、pxelinux.cfg/default、initrd.img等文件。
- BootServer响应客户端请求并传送文件
当服务器收到客户端的请求后,它们之间之后将有更多的信息在客户端与服务器之间作应答,用以决定启动参数。BootROM 由TFTP通讯协议从Boot Server下载启动安装程序所必须的文件(pxelinux.0、pxelinux.cfg/default)。default文件下载完成后,会根据该文件中定义的引导顺序,启动Liunx安装程序的引导内核。
- 请求下载自动应答文件
客户端通过pxelinux.cfg/default文件成功的引导Linux安装内核后,安装程序首先必须确定你通过什么介质来安装linux,如果通过网络安装(NFS.FTP.HTTP),则会在这个时候初始化网络,并定位安装源位置。
- 客户端将开始安装操作系统
将ks.cfg文件下载回来后,通过该文件找到OS Server,并安装该文件的配置请求下载安装过程需要的软件包。
OSServer和客户端建立连接后,将开始传输软件包,客户端将开始安装操作系统。安装完成后,将提示重新引导计算机。
二、PXE 环境安装与配置(以CentOS7.9 系统为例)
2.1 安装配置DHCP服务
- 安装DHCP服务
1
2
3
|
yum install -y dhcp # 安装 dhcp 软件包

rpm -ql dhcp        # 查看 dhcp 软件包 的所有文件列表
|
- 配置DHCP服务
 1
 2
 3
 4
 5
 6
 7
 8
 9
10
11
12
13
14
15
16
17
18
19
20
21
22
23
24
25
26
27
28
29
|
[root@master ~]# cat /etc/dhcp/dhcpd.conf
# dhcpd.conf

# option definitions common to all supported networks...
# option domain-name "example.org";
# option domain-name-servers ns1.example.org, ns2.example.org;

default-lease-time 600;
max-lease-time 7200;

server-name "PXEserver";

# Use this to enble / disable dynamic dns updates globally.
#ddns-update-style none;

# If this DHCP server is the official DHCP server for the local
# network, the authoritative directive should be uncommented.
#authoritative;

# Use this to send dhcp log messages to a different log file (you also
# have to hack syslog.conf to complete the redirection).
log-facility local7;

subnet 192.168.0.0 netmask 255.255.255.0 {      # 设置子网IP、子网掩码
  range 192.168.0.215 192.168.0.254;    # 设置地址池
  option routers 192.168.0.201;         # 设置网关地址
  next-server 192.168.0.201;            # 指定tftp的服务器地址
  filename "pxelinux.0";                # 指定启动文件
}
|
- 启动 DHCP 服务
1
2
3
|
systemctl enable dhcpd  # 在引导过程中启用dhcp 服务
systemctl start dhcpd   # 启动dhcp服务
systemctl status dhcpd	# 查验DHCP 服务状态
|
2.2 安装配置TFTP服务
- 安装TFTP服务
1
2
3
|
yum install -y tftp-server # 安装 tftp-server 软件包

rpm -ql tftp-server        # 查看 tftp-server 软件包 的所有文件列表
|
install script:
  1
  2
  3
  4
  5
  6
  7
  8
  9
 10
 11
 12
 13
 14
 15
 16
 17
 18
 19
 20
 21
 22
 23
 24
 25
 26
 27
 28
 29
 30
 31
 32
 33
 34
 35
 36
 37
 38
 39
 40
 41
 42
 43
 44
 45
 46
 47
 48
 49
 50
 51
 52
 53
 54
 55
 56
 57
 58
 59
 60
 61
 62
 63
 64
 65
 66
 67
 68
 69
 70
 71
 72
 73
 74
 75
 76
 77
 78
 79
 80
 81
 82
 83
 84
 85
 86
 87
 88
 89
 90
 91
 92
 93
 94
 95
 96
 97
 98
 99
100
101
102
103
104
105
106
107
108
109
110
111
112
113
114
115
116
117
118
119
120
121
122
123
124
125
126
127
128
129
130
131
132
133
134
135
136
137
138
139
140
141
142
143
144
145
146
147
148
149
150
151
152
153
154
155
156
157
158
159
160
161
162
163
164
165
166
167
168
169
170
171
172
173
174
175
176
177
178
179
180
181
182
183
184
185
186
187
188
189
190
191
192
193
194
195
196
197
198
199
200
201
202
203
204
205
206
207
208
209
210
211
212
213
214
215
216
217
218
219
220
221
222
223
224
225
226
227
228
229
230
231
232
233
234
235
236
237
238
239
240
241
242
243
244
245
246
247
248
249
250
251
252
253
254
255
256
257
258
259
260
261
262
263
264
265
266
267
268
269
270
271
272
273
274
275
276
277
278
279
280
281
282
283
284
285
286
287
288
289
290
291
292
293
294
295
296
297
298
299
300
301
302
303
304
305
306
307
308
309
310
311
312
313
314
315
316
317
318
319
320
321
322
323
324
325
326
327
328
329
330
331
332
333
334
335
336
337
338
339
340
341
342
343
344
345
346
347
348
349
350
351
352
353
354
355
356
357
358
359
360
361
362
363
364
365
366
367
368
369
370
371
372
373
374
375
376
377
378
379
380
381
382
383
384
385
386
387
388
389
390
391
392
393
394
395
396
397
398
399
400
401
402
403
404
405
406
407
408
409
410
411
412
413
414
415
416
417
418
419
420
421
422
423
424
425
426
427
428
429
430
431
432
433
434
435
436
437
438
439
440
|
#!/bin/bash
# -*- coding: utf-8 -*-
# Author: make.han
# Email: CIASM@CIASM
# Date: 2024/07/12
# install PXE Server debian 12

# preseed.cfg 编排
#https://www.debian.org/releases/stable/amd64/apbs04.zh-cn.html#ftn.idm3455

# TFTP 网络引导准备文件
#https://www.debian.org/releases/stable/amd64/ch04s05.zh-cn.html

# 安装手册
#https://www.debian.org/releases/stable

#dhcp ip address
nic_network_name=`ifconfig -s | awk 'NR>1 && !/^lo/ && !/^idrac/ && !/^br/ && !/^veth/ && !/^docker/{print $1; exit}'`
host_IP=`ifconfig -a | grep inet | grep -v '127.0.0.1' | awk '{ print $2}' | awk 'NR==1'`
IP="192.168.11.69"
MASK="255.255.255.0"
BROADCAST_ADDRESS="192.168.11.255"
ROUTERS="192.168.11.1"
SUBNET="192.168.11.0"
DNS="8.8.8.8"
RANGE="192.168.11.56 192.168.11.250"

#tftp variable configuration
tftp_port=69
tftp_user=tftp
tftp_catalogue=/var/lib/tftp

#debian catalogue
debian_11_catalogue=debian11.10
debian_12_catalogue=debian12.6
debian_iso=debian_iso
debian_cfg=debian_cfg

#netboot downlaod
netboot_11_url_download=https://mirrors.ustc.edu.cn/debian/dists/Debian11.10/main/installer-amd64/current/images/netboot/netboot.tar.gz
netboot_12_url_download=https://mirrors.ustc.edu.cn/debian/dists/Debian12.6/main/installer-amd64/current/images/netboot/netboot.tar.gz
netboot_gz=netboot.tar.gz

# root用户,普通用户 密码使用crypt(3)哈希进行加密(apt install -y whois) (mkpasswd -m sha-512 生成密钥)
root_password='$6$5vShu8v/wRoByWOr$0uGqOl9W40u.hXXZwLBrP6jGFubcw.UM3JE13eOkdm7RsfcnseVsCe1YBR6VawPtFH4rNROi2sJ35X98dNO.C/'
host_name=debian
common_user=debian
common_password='$6$5vShu8v/wRoByWOr$0uGqOl9W40u.hXXZwLBrP6jGFubcw.UM3JE13eOkdm7RsfcnseVsCe1YBR6VawPtFH4rNROi2sJ35X98dNO.C/'
time_zone="Asia/Shanghai"
mirror="ftp.cn.debian.org"

# apache2 variable configuration
apache_port=80
apache_catalogue=/var/www/html

#debian download
debian12_download_url=https://cdimage.debian.org/debian-cd/12.6.0/amd64/iso-dvd/debian-12.6.0-amd64-DVD-1.iso
debian11_download_url=https://cdimage.debian.org/cdimage/archive/11.10.0/amd64/iso-dvd/debian-11.10.0-amd64-DVD-1.iso
debian12_iso=debian-12.6.0-amd64-DVD-1.iso
debian11_iso=debian-11.10.0-amd64-DVD-1.iso

install_pxe_server (){

if ! [ -x "$(command -v dhcpd)" ]; then

	if [ $? -eq 0 ];then

echo "install firewalld"
apt install -y firewalld curl
firewall-cmd --zone=public --add-port=$tftp_port/tcp --permanent && firewall-cmd --reload
firewall-cmd --zone=public --add-port=$tftp_port/udp --permanent && firewall-cmd --reload

echo "install whois mkpasswd"
apt install -y whois

echo "install dhcp"
apt install -y isc-dhcp-server

echo "isc-dhcp-server add nic"
sed -i "s/^INTERFACESv4=.*$/INTERFACESv4=\"$nic_network_name\"/" /etc/default/isc-dhcp-server

echo "configuration dhcpd.conf"
rm -rf /etc/dhcp/dhcpd.conf
cat <<EOF>>/etc/dhcp/dhcpd.conf
option domain-name         "$DNS";
option domain-name-servers  $DNS;
default-lease-time 2592000;
max-lease-time 2592000;
authoritative;

# add follows
option space pxelinux;
option pxelinux.magic code 208 = string;
option pxelinux.configfile code 209 = text;
option pxelinux.pathprefix code 210 = text;
option pxelinux.reboottime code 211 = unsigned integer 32;
option architecture-type code 93 = unsigned integer 16;

subnet $SUBNET  netmask $MASK {
    range dynamic-bootp $RANGE;
    option broadcast-address $BROADCAST_ADDRESS;
    option routers $ROUTERS;

    #add follows
    class "pxeclients" {
        match if substring (option vendor-class-identifier, 0, 9) = "PXEClient";
        # PXE servers hostname or IP address
        next-server $host_IP;
        if option architecture-type = 00:07 {
            filename "bootx64.efi";
        }
        else {
            filename "pxelinux.0";
        }
    }
}
EOF

echo "install tftpd-hpa"
apt install -y tftpd-hpa

echo "configuration tftpd-hpa"
rm -rf /etc/default/tftpd-hpa
cat <<EOF>>/etc/default/tftpd-hpa
TFTP_USERNAME="$tftp_user"
TFTP_DIRECTORY="$tftp_catalogue/"
TFTP_ADDRESS=":$tftp_port"
TFTP_OPTIONS="--secure"
EOF

echo "Create a new tftp directory"
mkdir -p $tftp_catalogue/{$debian_11_catalogue,$debian_12_catalogue}

echo "start tftpd-hpa"
systemctl start tftpd-hpa

echo "install apache2"
apt install -y apache2

echo "Delete the default apache2 page"
rm -rf $apache_catalogue/index.html

echo "restart apache2"
systemctl restart apache2

echo "apache2 firewall"
firewall-cmd --zone=public --add-port=$apache_port/tcp --permanent && firewall-cmd --reload

# debian 11 12 Image download mount
<<!
echo "mkdir catalogue debian 11 12"
mkdir -p $apache_catalogue/{$debian_11_catalogue,$debian_12_catalogue}

echo "download debian 11 12"
mkdir -p $apache_catalogue/$debian_iso
curl -o $apache_catalogue/$debian_iso/$debian11_iso $debian11_download_url
curl -o $apache_catalogue/$debian_iso/$debian12_iso $debian12_download_url

echo "mount debian12_iso"
mount -t iso9660 -o loop,ro $apache_catalogue/$debian_iso/$debian11_iso $apache_catalogue/$debian_11_catalogue
mount -t iso9660 -o loop,ro $apache_catalogue/$debian_iso/$debian12_iso $apache_catalogue/$debian_12_catalogue

echo "Mount an image on startup"
sed -i "$ a $apache_catalogue/$debian_iso/$debian11_iso  $apache_catalogue/$debian_11_catalogue/ iso9660 defaults,loop,ro 0 0" /etc/fstab
sed -i "$ a $apache_catalogue/$debian_iso/$debian12_iso $apache_catalogue/$debian_12_catalogue/ iso9660 defaults,loop,ro 0 0" /etc/fstab
!

echo "downlaod netboot"
curl -o $tftp_catalogue/$debian_11_catalogue/$netboot_gz $netboot_11_url_download
curl -o $tftp_catalogue/$debian_12_catalogue/$netboot_gz $netboot_12_url_download

echo "decompression netboot"
tar -xf $tftp_catalogue/$debian_11_catalogue/$netboot_gz -C $tftp_catalogue/$debian_11_catalogue
tar -xf $tftp_catalogue/$debian_12_catalogue/$netboot_gz -C $tftp_catalogue/$debian_12_catalogue

echo "bios configuration default"
mkdir -p $tftp_catalogue/pxelinux.cfg
cat <<EOF | tee $tftp_catalogue/pxelinux.cfg/default
default vesamenu.c32

#自定义图片路径位置
#menu background /debian.png

menu hshift 13
menu width 49
menu margin 8
menu tabmsg
timeout 100

menu title Installer boot menu
label Auto Install Debian 11.10
  menu label ^Auto Install Debian 11.10
  menu default
  kernel $debian_11_catalogue/debian-installer/amd64/linux
  append auto=true priority=critical vga=788 initrd=$debian_11_catalogue/debian-installer/amd64/initrd.gz url=http://${host_IP}/$debian_cfg/debian-11-12-preseed.cfg
menu end

label Auto Install Debian 12.6
  menu label ^Auto Install Debian 12.6
  menu default
  kernel $debian_12_catalogue/debian-installer/amd64/linux
  append auto=true priority=critical vga=788 initrd=$debian_12_catalogue/debian-installer/amd64/initrd.gz url=http://${host_IP}/$debian_cfg/debian-11-12-preseed.cfg
menu end

label local
   #menu default
   com32 chain.c32
   menu label Boot from ^local drive
   localboot 0xffff
menu end
EOF

echo "syslinux pxelinux"
apt install -y syslinux pxelinux

cp /usr/lib/syslinux/modules/bios/* $tftp_catalogue/
#cp /usr/lib/syslinux/modules/bios/{ldlinux.c32,libutil.c32,menu.c32,vesamenu.c32} $tftp_catalogue/
cp /usr/lib/PXELINUX/{lpxelinux.0,pxelinux.0} $tftp_catalogue/

echo "shim-signed"
cd /
apt download shim-signed
dpkg -x shim-signed*deb shim
cp /shim/usr/lib/shim/shimx64.efi.signed $tftp_catalogue/bootx64.efi

echo "grub-efi-amd64-signed"
cd /
apt download grub-efi-amd64-signed
dpkg -x grub-efi-amd64-signed*deb grub
cp /grub/usr/lib/grub/x86_64-efi-signed/grubnetx64.efi.signed $tftp_catalogue/grubx64.efi

echo "grub-common"
cd /
apt download grub-common
dpkg -x grub-common*deb grub-common
cp /grub-common/usr/share/grub/unicode.pf2 $tftp_catalogue/

echo "rm shim grub grub-common"
rm -rf /{shim,grub,grub-common}
rm -rf /{shim-signed*deb,grub-efi-amd64-signed*deb,grub-common*deb}

echo "uefi configuration grub.cfg"
mkdir -p $tftp_catalogue/grub
cat <<EOF>>$tftp_catalogue/grub/grub.cfg
set default=4
set timeout=10
set gfxpayload=keep
set menu_color_highlight=cyan/black
set menu_color_normal=white/black
set color_normal=white/black

function load_video {
  insmod efi_gop
  insmod efi_uga
  insmod video_bochs
  insmod video_cirrus
  insmod all_video
}

load_video
insmod gzio
insmod part_msdos
insmod part_gpt
insmod ext2
insmod xfs
insmod png
insmod gfxterm
insmod gfxmenu
terminal_output gfxterm
background_image -m stretch bg.png

menuentry 'EFI Firmware System Setup'  'uefi-firmware' {
  fwsetup
}

menuentry 'Reboot System' {
  reboot
}

menuentry 'Shutdown System' {
  halt
}

menuentry 'Auto Install debian 11.10' {
    linuxefi $debian_11_catalogue/debian-installer/amd64/linux ip=dhcp auto=true priority=critical vga=788 url=http://${host_IP}/$debian_cfg/debian-11-12-preseed.cfg
    initrdefi $debian_11_catalogue/debian-installer/amd64/initrd.gz
}

menuentry 'Auto Install debian 12.6' {
    linuxefi $debian_12_catalogue/debian-installer/amd64/linux ip=dhcp auto=true priority=critical vga=788 url=http://${host_IP}/$debian_cfg/debian-11-12-preseed.cfg
    initrdefi $debian_12_catalogue/debian-installer/amd64/initrd.gz
}
EOF

echo "bios + uefi establish debian 11 12 cfg"
mkdir -p $apache_catalogue/$debian_cfg
cat <<EOF>>$apache_catalogue/$debian_cfg/debian-11-12-preseed.cfg
# 地区设置语言、国家和地区
d-i debian-installer/locale string en_US
d-i debian-installer/language string en
d-i debian-installer/country string CN
d-i debian-installer/locale string en_GB.UTF-8
d-i localechooser/supported-locales multiselect en_US.UTF-8, zh_CN.UTF-8

# 配置键盘
d-i keyboard-configuration/xkb-keymap select us

# 配置自动配置网络DHCP
d-i netcfg/choose_interface select auto

# 配置hostname和domain
d-i netcfg/get_hostname string $host_name
d-i netcfg/get_domain string $host_name

# 指定软件包镜像源的设置
d-i mirror/country string manual
d-i mirror/protocol string http
d-i mirror/http/hostname string $mirror
d-i mirror/http/directory string /debian
d-i mirror/http/proxy string

# 内网软件包镜像源的设置
#d-i mirror/http/hostname string 192.168.11.70
#d-i mirror/http/directory string /debian12
#d-i mirror/http/proxy string

# 选择软件包,标准系统实用程序
tasksel tasksel/first multiselect standard ssh-server

#开启root登录并设置root密码,关闭普通用户创建
d-i passwd/root-login boolean true
d-i passwd/make-user boolean false

# Root密码,可以是明文
#d-i passwd/root-password password $root_password
#d-i passwd/root-password-again password $root_password

# root用户密码使用crypt(3)哈希进行加密(apt install -y whois) (mkpasswd -m sha-512 生成密钥)
d-i passwd/root-password-crypted password $root_password

# 普通用户创建
#d-i passwd/make-user boolean true
#d-i passwd/user-fullname string Debian User
#d-i passwd/username string $common_user

# 普通用户密码,可以是明文
#d-i passwd/user-password password $common_password
#d-i passwd/user-password-again password $common_password

# 普通用户密码使用crypt(3)哈希进行加密(apt install -y whois) (mkpasswd -m sha-512 生成密钥)
#d-i passwd/user-password-crypted password $common_password

#允许弱密码在用户账户创建时被接受
d-i user-setup/allow-password-weak boolean true

# 时钟与时区设置
d-i clock-setup/utc boolean true
d-i time/zone string $time_zone
d-i clock-setup/ntp boolean false
#d-i clock-setup/ntp-server string ntp.example.com

# uefi引导,强制使用gpt分区表
d-i partman-efi/non_efi_system boolean true
d-i partman-partitioning/choose_label string gpt
d-i partman-partitioning/default_label string gpt

# 配置磁盘 LVM xfs
d-i partman-auto/method string lvm
d-i partman-auto/disk string /dev/sda
d-i partman-lvm/device_remove_lvm boolean true
d-i partman-lvm/confirm boolean true
d-i partman-lvm/confirm_nooverwrite boolean true
d-i partman-auto/choose_recipe select atomic
d-i partman/default_filesystem string xfs

# partman在没有确认的情况下自动分区
d-i partman-partitioning/confirm_write_new_label boolean true
d-i partman/choose_partition select finish
d-i partman/confirm boolean true
d-i partman/confirm_nooverwrite boolean true

# 基本系统安装
#d-i  base-installer/kernel/p_w_picpath string linux-server

#设置apt
#d-i apt-setup/security_host string mirrors.aliyun.com
#d-i apt-setup/security_path string /ubuntu
#d-i debian-installer/allow_unauthenticated string false
#d-i pkgsel/upgrade select safe-upgrade
#d-i pkgsel/language-packs multiselect
#d-i pkgsel/update-policy select none
#d-i pkgsel/updatedb boolean trueb

# 禁止在安装的时候弹出CD/DVD扫描提示
d-i apt-setup/non-free boolean true
d-i apt-setup/contrib boolean true
d-i apt-setup/cdrom/set-first boolean false
d-i apt-setup/cdrom/set-next boolean false
d-i apt-setup/cdrom/set-failed boolean false

# 安装额外的软件包,不更新系统
d-i pkgsel/include string openssh-server vim vim-tiny sudo whois git firewalld curl
d-i pkgsel/upgrade select none

# grub安装
d-i grub-installer/only_debian boolean true
d-i grub-installer/with_other_os boolean true
d-i grub-installer/bootdev string default
d-i grub-installer/skip boolean false
d-i grub-installer/bootdev string /dev/sda
#d-i lilo-installer/skip boolean false

# 安装完成之后不要弹出安装完成的界面,直接重启
d-i finish-install/reboot_in_progress note

# 允许ssh服务使用root用户登录
d-i preseed/late_command string in-target sed -i '$ a\PermitRootLogin yes' /etc/ssh/sshd_config
EOF

echo "enable tftp dhcp"
systemctl enable tftpd-hpa isc-dhcp-server apache2

echo "restart tftpd-hpa isc-dhcp-server"
systemctl restart tftpd-hpa isc-dhcp-server apache2

   echo -e "\033[32mThe pxe server Install Sussess...\033[0m"
  else
   echo -e "\033[33mThe pxe server Install Failed...\033[0m"
    exit 1
   fi
  else
   echo -e "\033[31mThe pxe server Install already...\033[0m"
fi
}

main (){
	install_pxe_server
}

main
|