一、Gin 框架介绍
1.1 Gin 框架简介
Gin 是一个 Go (Golang) 编写的非常优秀的 轻量级 Web Framework,性能非常高,并且设计简洁,擅长编写高性能的 Api 接口应用。
Gin框架 自身也是基于 Golang 标准库 net/http 开发的,很多功能实现都是在标准库的基础上进行的封装实现。
基于 Gin 开发的一般流程为使用 gin.New 或者 gin.Default 函数创建一个 *gin.Engine 实例,然后使用该实例的相关方法:
- 创建路由组(routergroup)
- 添加中间件(middleware)
- 注册 HTTP 路由(path)
- 处理函数(HandlerFunc)
最后 调用 Run 方法监听端口和启动服务,其中 创建路由组(routergroup)、添加中间件(middleware) 为可选操作。在 处理函数(HandlerFunc) 内通过 gin.Context 获取参数,进行逻辑处理,通过 gin.Context 暴露的方法(如 JSON() `)写回输出。
Gin 应用示例:
 1
 2
 3
 4
 5
 6
 7
 8
 9
10
11
12
13
14
15
16
17
18
19
20
|
package main

import (
    "github.com/gin-gonic/gin"
)

func main() {
    // 创建一个默认的路由引擎
    r := gin.Default()
    // 配置路由
    r.GET("/", func(c *gin.Context) {
        c.JSON(200, gin.H{
            "username": "name1",
            "data": "data1",
        })
    })
    // 启动 HTTP 服务,默认在 0.0.0.0:8080 启动服务, 可改变默认启动端口
    r.Run()
    // r,Run(":9000")
}
|
1.2 Gin 的核心数据结构 Engine
在使用 Gin 开发应用时,第一步就需要先调用 gin.Default() 或者 gin.New() 函数,创建一个 *gin.Engine 实例对象,该对象是 Gin 中的一个核心对象。创建 *gin.Engine 对象 的函数如下:
 1
 2
 3
 4
 5
 6
 7
 8
 9
10
11
12
13
14
15
16
17
18
19
20
21
22
23
24
25
26
27
28
29
30
31
32
33
34
35
36
37
38
39
40
41
42
43
44
45
46
47
48
49
50
51
52
|
// New returns a new blank Engine instance without any middleware attached.
// By default, the configuration is:
// - RedirectTrailingSlash:  true
// - RedirectFixedPath:      false
// - HandleMethodNotAllowed: false
// - ForwardedByClientIP:    true
// - UseRawPath:             false
// - UnescapePathValues:     true
func New() *Engine {
    debugPrintWARNINGNew()

    // 实例化 RouteGroup,路由管理相关(Engine自身也是一个RouterGroup)
    engine := &Engine{
        RouterGroup: RouterGroup{
            Handlers: nil,
            basePath: "/",
            root:     true,
        },
        FuncMap:                template.FuncMap{},
        RedirectTrailingSlash:  true,
        RedirectFixedPath:      false,
        HandleMethodNotAllowed: false,
        ForwardedByClientIP:    true,
        RemoteIPHeaders:        []string{"X-Forwarded-For", "X-Real-IP"},
        TrustedPlatform:        defaultPlatform,
        UseRawPath:             false,
        RemoveExtraSlash:       false,
        UnescapePathValues:     true,
        MaxMultipartMemory:     defaultMultipartMemory,
        // trees 负责存储路由和处理方法的映射,采用类似字典树的结构(这里构造了几棵树,每棵树对应一个http请求方法)
        trees:                  make(methodTrees, 0, 9),
        delims:                 render.Delims{Left: "{{", Right: "}}"},
        secureJSONPrefix:       "while(1);",
        trustedProxies:         []string{"0.0.0.0/0", "::/0"},
        trustedCIDRs:           defaultTrustedCIDRs,
    }
    engine.RouterGroup.engine = engine

    // 基于sync.Pool实现的 context池,能够避免context频繁销毁和重建
    engine.pool.New = func() any {
        return engine.allocateContext(engine.maxParams)
    }
    return engine
}

// Default returns an Engine instance with the Logger and Recovery middleware already attached.
func Default() *Engine {
    debugPrintWARNINGDefault()
    engine := New()                     // 先调用 New 函数创建了 *Engine 对象
    engine.Use(Logger(), Recovery())    // 再调用 Use 方法注册 Logger 和 Recovery 两个 middleware
    return engine
}
|
Engine 对象是 gin 的框架实例,它其中包括了路由定义以及一些配置相关的参数,结构中一些核心对象:
- RouterGroup: 管理路由和中间件的组件,它定义了 URL 路径与处理函数的映射关系;
- RedirectTrailingSlash:如果当前路径的处理函数不存在,但是路径+’/‘的处理函数存在,则允许进行重定向,默认为 true;
- RedirectFixedPath:允许修复当前请求路径,如/FOO和/..//Foo会被修复为/foo,并进行重定向,默认为 false;
- UseRawPath:使用未转义的请求路径(url.RawPath),默认为 false;
- UnescapePathValues:对请求路径值进行转义(url.Path),默认为 true;
- RemoveExtraSlash:去除额外的反斜杠,默认为 false
- trees: 每一个 HTTP 方法会有一颗方法树,方法树记录了路径和路径上的处理函数;
- context: 对象池,gin.Context 是 gin框架 暴露给开发的另一个核心对象,可以通过该对象获取请求信息,业务处理的结果也是通过该对象写回客户端的。为了实现context对象的复用,gin基于 sync.Pool 实现了该对象池;
Tips: Golang的 http标准库 的 http.ListenAndServe 函数的第二个参数是一个名为 Handler 的接口类型,只要实现了该接口的 ServeHTTP(ResponseWriter, *Request) 方法,就能够对 HTTP 请求进行自定义处理。
1
2
3
|
type Handler interface {
    ServeHTTP(ResponseWriter, *Request)
}
|
gin.Engine 就是 http.Handler接口 的一个实现,因为 gin.Engine 实现了该方法。
 1
 2
 3
 4
 5
 6
 7
 8
 9
10
11
|
// ServeHTTP conforms to the http.Handler interface.
func (engine *Engine) ServeHTTP(w http.ResponseWriter, req *http.Request) {
    c := engine.pool.Get().(*Context)
    c.writermem.reset(w)
    c.Request = req
    c.reset()

    engine.handleHTTPRequest(c)

    engine.pool.Put(c)
}
|
RouterGroup 用来配置 HTTP 路由,它关联了一个路径前缀和其对应的处理函数,同时 RouterGroup 也包含了关联它的 Engine 对象,当调用 RouterGroup 的路由定义方法时会在 Engine 的路由树上创建路径与其处理函数。
1
2
3
4
5
6
7
8
|
// RouterGroup is used internally to configure router, a RouterGroup is associated with
// a prefix and an array of handlers (middleware).
type RouterGroup struct {
    Handlers HandlersChain
    basePath string
    engine   *Engine
    root     bool
}
|
HandlerFunc 是路由的处理函数,它在 gin 中的定义如下,是一个接收 *Context 作为参数的函数,HandlersChain 是处理函数的调用链,通常包括了路由上定义的中间件以及最终处理函数。
 1
 2
 3
 4
 5
 6
 7
 8
 9
10
11
12
13
|
// HandlerFunc defines the handler used by gin middleware as return value.
type HandlerFunc func(*Context)

// HandlersChain defines a HandlerFunc slice.
type HandlersChain []HandlerFunc

// Last returns the last handler in the chain. i.e. the last handler is the main one.
func (c HandlersChain) Last() HandlerFunc {
    if length := len(c); length > 0 {
        return c[length-1]
    }
    return nil
}
|
1.3 Gin 的核心数据结构 Context 上下文
Context 是处理函数调用链传递的对象,它包括了 HTTP 的请求对象,请求参数,和 构造 HTTP 响应的对象,它允许使用者在调用链中传递自定义变量,并在调用链的其它地方通过 Context 对象把它取出来。
Context 实现了对HTTP request 和 response 的处理封装,是 Gin的核心实现之一,学习使用 Gin 框架就是学习使用 gin.Context包 的过程,它内部封装了request 和 response 过程中的数据,其定义为:
 1
 2
 3
 4
 5
 6
 7
 8
 9
10
11
12
13
14
15
16
17
18
19
20
21
22
23
24
25
26
27
28
29
30
31
32
33
34
35
36
37
38
39
40
41
42
|
// Context is the most important part of gin. It allows us to pass variables between middleware,
// manage the flow, validate the JSON of a request and render a JSON response for example.
type Context struct {
    writermem responseWriter
    Request   *http.Request  // http请求
    Writer    ResponseWriter // http响应输出流

    Params   Params        // URL路径参数
    handlers HandlersChain // 处理器链
    index    int8          // 当前的处理进度,即处理链路处于函数链的索引位置
    fullPath string

    engine       *Engine
    params       *Params
    skippedNodes *[]skippedNode

    // This mutex protects Keys map.
    mu sync.RWMutex // 用于保护下面的 Keys map 的读写互斥锁

    // 提供对外暴露的 Get 和 Set 接口向用户提供了共享数据的存取服务,相关操作都在读写锁的保护之下,能够保证并发安全
    // 缓存 handlers 链上共享数据的 map,由于使用的map,避免了设置多个值时context形成链表
    // Keys is a key/value pair exclusively for the context of each request.
    Keys map[string]any

    // Errors is a list of errors attached to all the handlers/middlewares who used this context.
    Errors errorMsgs

    // Accepted defines a list of manually accepted formats for content negotiation.
    Accepted []string

    // 查询参数缓存,使用时调用`Request.URL.Query()`,该方法每次都会对原始的查询字符串进行解析,所以这里设置缓存避免冗余的解析操作
    // queryCache caches the query result from c.Request.URL.Query().
    queryCache url.Values

    // formCache caches c.Request.PostForm, which contains the parsed form data from POST, PATCH,
    // or PUT body parameters.
    formCache url.Values // 表单参数缓存,作用同上

    // SameSite allows a server to define a cookie attribute making it impossible for
    // the browser to send this cookie along with cross-site requests.
    sameSite http.SameSite
}
|
由于Context 封装了 http.Request 和 ResponseWriter(内部是http.ResponseWriter)对象,因此可以通过context对http请求响应进行操作。
context中还封装了处理器链HandlersChain和当前处理位置索引,对应着处理函数在调用链中的位置,并可通过调用 Next 方法继续执行调用链中的下一个处理函数,来实现调用链的控制流。
 1
 2
 3
 4
 5
 6
 7
 8
 9
10
|
// Next should be used only inside middleware.
// It executes the pending handlers in the chain inside the calling handler.
// See example in GitHub.
func (c *Context) Next() {
    c.index++
    for c.index < int8(len(c.handlers)) {
        c.handlers[c.index](c)
        c.index++
    }
}
|
另外,由于 Golang 的标准库中的 Context 能够以链表形式存储值(也就是说每个k-v会对应一个context,这些context之间之间以链表形式连接),当存在大量值时,访问效率比较低。因此 gin.Context 在内部有一个 map[string]any结构 专门用于保存这些值,并且提供了线程安全(加锁)访问方法。
 1
 2
 3
 4
 5
 6
 7
 8
 9
10
11
12
13
14
15
16
17
18
|
func (c *Context) Set(key string, value any) {
    c.mu.Lock()
    defer c.mu.Unlock()
    if c.Keys == nil {
        c.Keys = make(map[string]any)
    }

    c.Keys[key] = value
}

// Get returns the value for the given key, ie: (value, true).
// If the value does not exist it returns (nil, false)
func (c *Context) Get(key string) (value any, exists bool) {
    c.mu.RLock()
    defer c.mu.RUnlock()
    value, exists = c.Keys[key]
    return
}
|
针对需要用到表单参数和查询字符串参数的场景,gin.Context进行了优化,设计了两个缓存结构(即queryCache和formCache)来提高重复访问时的效率。以表单参数为例:
 1
 2
 3
 4
 5
 6
 7
 8
 9
10
11
12
13
14
15
16
17
18
19
20
21
22
23
24
25
26
27
28
29
30
31
32
33
34
35
36
|
func (c *Context) PostForm(key string) (value string) {
    value, _ = c.GetPostForm(key)
    return
}

func (c *Context) GetPostForm(key string) (string, bool) {
    if values, ok := c.GetPostFormArray(key); ok {
        return values[0], ok
    }
    return "", false
}

func (c *Context) PostFormArray(key string) (values []string) {
    values, _ = c.GetPostFormArray(key)
    return
}

func (c *Context) GetPostFormArray(key string) (values []string, ok bool) {
    c.initFormCache()
    values, ok = c.formCache[key]
    return
}

func (c *Context) initFormCache() {
    if c.formCache == nil {
        c.formCache = make(url.Values)
        req := c.Request
        // 从这里可以看出,如果不使用缓存,则每次都会解析请求,效率较低
        if err := req.ParseMultipartForm(c.engine.MaxMultipartMemory); err != nil {
            if !errors.Is(err, http.ErrNotMultipart) {
                debugPrint("error on parse multipart form array: %v", err)
            }
        }
        c.formCache = req.PostForm
    }
}
|
通过这样两个缓存结构,避免每次请求时都调用net/http库的方法。
1.4 Gin 的核心数据结构 IRouter 路由注册实现
IRouter 接口定义了路由注册 及 分组相关规范,RouterGroup 实现了 IRouter 接口定义的方法,因此 Engine 也是一个 IRouter 的实现,IRouter 定义了 HTTP 路由的创建方法,包括GET,POST,PUT,DELETE方法等,以及 Group 方法,它返回的 IRoutes 对象实际是一个*RouterGroup对象,用来创建一个路由组。
 1
 2
 3
 4
 5
 6
 7
 8
 9
10
11
12
13
14
15
16
17
18
19
20
21
22
23
24
25
26
|
// IRouter defines all router handle interface includes single and group router.
type IRouter interface {
    IRoutes
    Group(string, ...HandlerFunc) *RouterGroup
}

// IRoutes defines all router handle interface.
type IRoutes interface {
    Use(...HandlerFunc) IRoutes

    Handle(string, string, ...HandlerFunc) IRoutes
    Any(string, ...HandlerFunc) IRoutes
    GET(string, ...HandlerFunc) IRoutes
    POST(string, ...HandlerFunc) IRoutes
    DELETE(string, ...HandlerFunc) IRoutes
    PATCH(string, ...HandlerFunc) IRoutes
    PUT(string, ...HandlerFunc) IRoutes
    OPTIONS(string, ...HandlerFunc) IRoutes
    HEAD(string, ...HandlerFunc) IRoutes
    Match([]string, string, ...HandlerFunc) IRoutes

    StaticFile(string, string) IRoutes
    StaticFileFS(string, string, http.FileSystem) IRoutes
    Static(string, string) IRoutes
    StaticFS(string, http.FileSystem) IRoutes
}
|
1.5 Engine 执行 Run 方法时的过程
当 Engine 在执行 Run 方法时,会调用 resolveAddress 解析传入的地址,若没有传入地址,则默认使用 PORT 环境变量作为端口号,在此端口上运行 HTTP 服务,若 PORT 环境变量也未设置,则 使用 8080 端口 运行 HTTP服务,接着调用 http.ListenAndServe,把自身作为一个 http.Handler,监听和处理 HTTP 请求。
 1
 2
 3
 4
 5
 6
 7
 8
 9
10
11
12
13
14
15
16
|
// Run attaches the router to a http.Server and starts listening and serving HTTP requests.
// It is a shortcut for http.ListenAndServe(addr, router)
// Note: this method will block the calling goroutine indefinitely unless an error happens.
func (engine *Engine) Run(addr ...string) (err error) {
    defer func() { debugPrintError(err) }()

    if engine.isUnsafeTrustedProxies() {
        debugPrint("[WARNING] You trusted all proxies, this is NOT safe. We recommend you to set a value.\n" +
            "Please check https://pkg.go.dev/github.com/gin-gonic/gin#readme-don-t-trust-all-proxies for details.")
    }

    address := resolveAddress(addr)
    debugPrint("Listening and serving HTTP on %s\n", address)
    err = http.ListenAndServe(address, engine.Handler())
    return
}
|
Engine 实现了 http.Handler 接口的 ServeHTTP(w http.ResponseWriter, req *http.Request) 方法,接收到 HTTP 请求后会调用 Engine 的 ServeHTTP 方法进行请求处理:
- 首先 Engine 会从 context 对象池中取出一个 *Context,使用对象池管理 Context 可以尽量减少频繁创建对象带来的 GC;
- 拿出一个 *Context 之后,进行相应的设置,作为请求的上下文对象;
- 将 请求的上下文对象 传递到请求处理方法 handleHTTPRequest方法里进行处理;
- handleHTTPRequest 处理完成后 将 请求的上下文对象 回收 回 pool 中;
 1
 2
 3
 4
 5
 6
 7
 8
 9
10
11
12
|
// ServeHTTP conforms to the http.Handler interface.
func (engine *Engine) ServeHTTP(w http.ResponseWriter, req *http.Request) {
    c := engine.pool.Get().(*Context)
    // 将 http.ResponseWriter 和 http.Request 对象保存到 context 对象中
    c.writermem.reset(w)
    c.Request = req
    c.reset()

    engine.handleHTTPRequest(c)

    engine.pool.Put(c)
}
|
在 Engine 的 handleHTTPRequest 方法中,进行了下面几个步骤:
- 根据配置参数决定是否使用编码后的 URL 路径,以及去除多余的反斜杠。
- 根据 HTTP 请求方法找到对应的方法树,若找到对应的方法树,从方法树中获取路由信息,并把处理函数,参数路径信息记录到 Context 上,调用 Context 的 Next 方法开始执行调用链上的函数。若方法树中不存在路由信息,则判断路径+’/‘的路由定义是否存在,并尝试进行重定向。
- 如果没有找到对应路由信息,根据配置参数返回 HTTP 404 (NOT FOUND) 或 405 (METHOD NOT ALLOWED) 错误。
 1
 2
 3
 4
 5
 6
 7
 8
 9
10
11
12
13
14
15
16
17
18
19
20
21
22
23
24
25
26
27
28
29
30
31
32
33
34
35
36
37
38
39
40
41
42
43
44
45
46
47
48
49
50
51
52
53
54
55
56
57
58
59
60
61
62
63
64
65
66
67
68
69
70
71
72
|
func (engine *Engine) handleHTTPRequest(c *Context) {
    httpMethod := c.Request.Method
    rPath := c.Request.URL.Path
    unescape := false

    // 根据配置参数决定是否使用编码后的 URL 路径
    if engine.UseRawPath && len(c.Request.URL.RawPath) > 0 {
        rPath = c.Request.URL.RawPath
        unescape = engine.UnescapePathValues
    }

    // 根据配置参数决定是否去除多余的反斜杠。
    if engine.RemoveExtraSlash {
        rPath = cleanPath(rPath)
    }

    // Find root of the tree for the given HTTP method
    t := engine.trees
    for i, tl := 0, len(t); i < tl; i++ {
        // 根据 HTTP 请求方法找对应的方法树
        if t[i].method != httpMethod {
            continue
        }

        // 若找到对应的方法树,从方法树中获取路由信息,并把处理函数、参数路径信息记录到 Context 上
        root := t[i].root
        // Find route in tree
        // 根据请求路径获取路由树节点信息,包括处理器链和路径
        value := root.getValue(rPath, c.params, c.skippedNodes, unescape)
        if value.params != nil {
            c.Params = *value.params
        }

        // 将处理器链注入到context中
        if value.handlers != nil {
            c.handlers = value.handlers
            c.fullPath = value.fullPath
            c.Next()    // 按顺序调用处理器链中的每一个处理器,对请求进行处理
            c.writermem.WriteHeaderNow()
            return
        }

        // 若方法树中不存在路由信息,则判断路径+'/'的路由定义是否存在,并尝试进行重定向。
        if httpMethod != http.MethodConnect && rPath != "/" {
            if value.tsr && engine.RedirectTrailingSlash {
                redirectTrailingSlash(c)
                return
            }
            if engine.RedirectFixedPath && redirectFixedPath(c, root, engine.RedirectFixedPath) {
                return
            }
        }
        break
    }

    // 如果没有找到对应路由信息,根据配置参数返回 HTTP 404 (NOT FOUND) 或 405 (METHOD NOT ALLOWED) 错误。
    if engine.HandleMethodNotAllowed {
        for _, tree := range engine.trees {
            if tree.method == httpMethod {
                continue
            }
            if value := tree.root.getValue(rPath, nil, c.skippedNodes, unescape); value.handlers != nil {
                c.handlers = engine.allNoMethod
                serveError(c, http.StatusMethodNotAllowed, default405Body)
                return
            }
        }
    }
    c.handlers = engine.allNoRoute
    serveError(c, http.StatusNotFound, default404Body)
}
|
一般情况下,会在业务处理函数中调用context暴露的方法将响应写入到http输出流中。但是如果没调用,这里会帮忙做这件事(WriteHeaderNow),给客户端一个响应。代码如下:
二、Gin 框架中的路由(Routing)
2.1 RESTful API 设计规范简介
RESTful API 是目前比较成熟的一套互联网应用程序的 API 设计理论,在 RESTful API 设计规范中,有一部分是针对 HTTP Method 动作的定义,规定了这些方法对于具体资源的操作方式,比如 GET、POST、DELETE 这些是最常用的,除了它们,HTTP 规范还定义了很多其它的 HTTP Method。
URL设计规范
URL为统一资源定位器,接口属于服务端资源,首先要通过URL这个定位到资源才能去访问,而通常一个完整的URL组成由以下几个部分构成:
1
|
scheme://host:[port]/path[?querys][#fragment]
|
- scheme: 指底层用的协议,如http、https、ftp;
- host: 服务器的IP地址或者域名;
- port: 端口,http默认为80端口;
- path: 访问资源的路径,也称作 URI 就是各种 web 框架中定义的 route路由;
- query: 查询字符串,为发送给服务器的参数,在这里更多发送数据分页、排序等参数;
- fragment: 锚点,定位到页面的资源;
Tips: URI 统一资源标识符(Uniform Resource Identifier)是一个用于标识某一互联网资源名称的字符串。
RESTful 对 path 的设计做了一些规范,通常一个 RESTful API 的 path 组成如下:
1
|
/{version}/{resources}/{resource_id}
|
- version:API版本号,有些版本号放置在头信息中也可以,通过控制版本号有利于应用迭代;
- resources:资源,RESTful API推荐用小写英文单词的复数形式;
- resource_id:资源的id,访问或操作该资源;
当然,有时候可能资源级别较大,其下还可细分很多子资源也可以灵活设计URL的path,例如:
1
|
/{version}/{resources}/{resource_id}/{subresources}/{subresource_id}
|
此外,有时可能增删改查无法满足业务要求,可以在URL末尾加上action,例如
1
|
/{version}/{resources}/{resource_id}/action
|
其中 action 就是对资源的操作。
从大体样式了解URL路径组成之后,对于RESTful API的URL具体设计的规范如下:
- 不用大写字母,所有单词使用英文且小写;
- 连字符用中杠"-“而不用下杠”_";
- 正确使用 “/“表示层级关系,URL的层级不要过深,并且越靠前的层级应该相对越稳定;
- 结尾不要包含正斜杠分隔符”/";
- URL中不出现动词,用请求方式表示动作;
- 资源表示用复数不要用单数;
- 不要使用文件扩展名;
在 RESTful API 设计规范中,每个网址代表一种资源,不同的 HTTP Method 请求方式 表示执行不同的操作。以下列出的是业界使用的最广泛的五种 HTTP Method:
| 请求资源方式 |
说明 |
| GET (SELECT) |
读取服务器上的资源,请求一个指定资源的表示形式,使用 GET 的请求应该只被用于获取数据 |
| POST(CREATE) |
在服务器上创建资源,用于将实体提交到指定的资源,通常导致在服务器上的状态变化或副作用 |
| PUT (UPDATE) |
更新或者替换服务器上的资源, 用于请求有效载荷替换目标资源的所有当前表示 |
| PATCH |
更新/修改资源的一部分,用于对资源应用部分修改 |
| DELETE |
删除服务器上指定的资源 |
这里通过一些URL示例来更好的说明这些HTTP方法的使用:
- 以下是两个GET方法的示例,第一个表示获取所有用户的信息;第二个表示获取id为123用户的信息;
1
2
|
HTTP GET https://www.test.com/users
HTTP GET https://www.test.com/users/123
|
- POST 表示创建一个用户,会通过 POST 给服务器提供创建这个用户所需的全部信息,注意这里users是个复数;
1
|
HTTP POST https://www.test.com/users
|
- 这表示要更新/替换id为123的这个用户,在更新的时候,会通过PUT提供更新这个用户需要的全部用户信息。这里PUT和POST不太一样的是 ,从URL看,PUT操作的是单个资源,比如这里id为123的这个用户;
1
|
HTTP PUT https://www.test.com/users/123
|
- PATCH也更新资源,它和PUT不一样的是,它只能更新这个资源的部分信息,而不是全部(这种也叫替换),是部分更新。所以我们无需提供全部用户信息给服务器,需要更新哪些就提供哪些;
1
|
HTTP PATCH https://www.test.com/users/123
|
- 删除非常简单,也是操作单个资源,这里是删除id为123的这个用户;
1
|
HTTP DELETE https://www.test.com/users/123
|
2.2 Gin 的路由(Routing)注册 及 实现(遵从RESTful API风格)
Gin 中的 路由(Routing) 是由一个 URI(或者叫路径)和 一个特定的 HTTP Method(GET、POST 等)组成的,涉及到应用如何响应客户端对某个网站节点的资源操作(CRUD)。使用 Gin 可以便捷的开发符合 RESTful 规范的 API 服务。
在 前面 1.4 小节中介绍到,IRouter 接口定义了路由注册 及 分组相关规范,由 RouterGroup 实现了 IRouter 接口,因此 Engine(匿名内嵌了RouterGroup)也是一个 IRouter 的实现,IRouter 定义了 HTTP 路由的路由注册方法,包括GET,POST,PUT,DELETE方法等。
Gin 中的 Engine 对象 或者 RouterGroup对象使用这些路由注册方法,可以很容易的实现各种 HTTP Method 的路由注册。如下所示:
 1
 2
 3
 4
 5
 6
 7
 8
 9
10
11
12
13
14
15
16
17
18
19
|
r := gin.Default()
r.GET("/users", func(context *gin.Context) {
    //获取用户列表
})
r.PUT("/usrs/123", func(context *gin.Context) {
    //获取用户id为123的用户信息
})
r.POST("/users", func(context *gin.Context) {
    //创建一个用户
})
r.PUT("/usrs/123", func(context *gin.Context) {
    //更新ID为123的用户
})
r.PATCH("/usrs/123", func(context *gin.Context) {
    //更新ID为123用户的部分信息
})
r.DELETE("/usrs/123", func(context *gin.Context) {
    //删除ID为123的用户
})
|
此外还有不常用的 HEAD、OPTIONS、TRACE、CONNECT 等方法,从中可以看出,Gin的API非常友好,可以很容易的使用相应的方法来注册对某个 HTTP Method 的处理。
这些方法都直接调用 RouterGroup 的 handle 方法在 Engine 对象上注册 路由。
在前面的 1.5 小节讲到 处理 HTTP 请求的 handleHTTPRequest 方法中 根据 HTTP 请求 Method(GET、POST、DELETE等等)找到对应的 方法树,这棵 方法树 就是 Engine 对象的 trees(Slice)的 一个元素 对象,Engine 对象的这类方法树 正是在注册路由时由 handle 方法 调用 Engine 对象的 addRoute 方法创建的。
接下来了解如何在一颗方法树上创建路径节点,以注册一个 HTTP GET 方法的路由为例,当在调用 Router 的 GET 方法时,最终会调用到 Engine 的 addRoute 方法,addRoute 会根据 HTTP 方法获取到对应的方法树,如果方法树不存在,则创建一颗方法树,添加到 Engine 的 trees 上,最后在方法树上调用 addRoute 创建路径节点。相关代码实现如下:
 1
 2
 3
 4
 5
 6
 7
 8
 9
10
11
12
13
14
15
16
17
18
19
20
21
22
23
24
25
26
27
28
29
30
31
32
33
34
35
36
37
38
39
40
41
42
43
44
45
46
|
// routergroup.go
// GET is a shortcut for router.Handle("GET", path, handlers).
// 主从 HTTP GET 类型请求路由的 方法
// RouterGroup 实现的 IRouter 接口的其它方法 与 GET 相似,都调用 handle 方法来注册对应路由
func (group *RouterGroup) GET(relativePath string, handlers ...HandlerFunc) IRoutes {
    return group.handle(http.MethodGet, relativePath, handlers)
}

func (group *RouterGroup) handle(httpMethod, relativePath string, handlers HandlersChain) IRoutes {
    absolutePath := group.calculateAbsolutePath(relativePath)
    handlers = group.combineHandlers(handlers)
    group.engine.addRoute(httpMethod, absolutePath, handlers)
    return group.returnObj()
}

// gin.go
func (engine *Engine) addRoute(method, path string, handlers HandlersChain) {
    assert1(path[0] == '/', "path must begin with '/'")
    assert1(method != "", "HTTP method can not be empty")
    assert1(len(handlers) > 0, "there must be at least one handler")

    debugPrintRoute(method, path, handlers)

    // 根据 HTTP Method 获取到对应的方法树
    root := engine.trees.get(method)

    // 如果方法树不存在,则创建一颗方法树,添加到 Engine 的 trees 上
    if root == nil {
        root = new(node)
        root.fullPath = "/"
        engine.trees = append(engine.trees, methodTree{method: method, root: root})
    }

    // 调用 方法树的 addRoute方法 创建(注册)路径节点
    root.addRoute(path, handlers)

    // Update maxParams
    // 判断 新注册的路由路径参数的 数量 是否超过配置的最大参数限制
    if paramsCount := countParams(path); paramsCount > engine.maxParams {
        engine.maxParams = paramsCount
    }

    if sectionsCount := countSections(path); sectionsCount > engine.maxSections {
        engine.maxSections = sectionsCount
    }
}
|
此外,Gin还提供了一次注册所有的HTTP Method的便捷的方式:
 1
 2
 3
 4
 5
 6
 7
 8
 9
10
11
12
13
14
15
16
17
|
var (
    // anyMethods for RouterGroup Any method
    anyMethods = []string{
        http.MethodGet, http.MethodPost, http.MethodPut, http.MethodPatch,
        http.MethodHead, http.MethodOptions, http.MethodDelete, http.MethodConnect,
        http.MethodTrace,
    }
)
// Any registers a route that matches all the HTTP methods.
// GET, POST, PUT, PATCH, HEAD, OPTIONS, DELETE, CONNECT, TRACE.
func (group *RouterGroup) Any(relativePath string, handlers ...HandlerFunc) IRoutes {
    for _, method := range anyMethods {
        group.handle(method, relativePath, handlers)
    }

    return group.returnObj()
}
|
Gin 提供的 Any方法,可以一次性注册以上这些 HTTP Method方法。
在注册路由路由时,通常无法穷举出所有的 path,例如上面的 users 后面的 id,不可能穷举出每一个ID 并为其都注册上述路由。因此 Gin 框架提供了 path 变量参数的 动态路由 功能,通过这一个能,可以对者一类具有相同特征的路由进行分类,把这类路由的不同的部分参数化,并从路径中获取相应的参数进行操作。
如上面的 users开头的、后面跟 id 的路由 可以把 id 部分参数化,这样 一个类HTTP Method 只需注册一次路由,便可动态的支持所有id。例如下面的路由路径(uri):
1
2
3
4
5
|
/users/1
/users/2
/users/3
...
/users/xxx
|
Gin 中使用 冒号: 和 星号* 后面跟参数标签 的形式来支持路由参数化(动态路由),然后再路由处理函数中只用这个 参数标签 即可查找到实际的路由参数。(Gin的路由采用的是httprouter,所以它的路由参数的定义和httprouter也是一样的。)
- 冒号
: 路由参数
冒号 : 路由参数 是一种匹配模式是精确匹配的动态路由模式,参数只能且必须匹配一个模式,例如上面的 users + id 一类的路由路径,使用冒号 : 对路由进行参数化,可以归纳为 /users/:id,:id 表示此位置为路由参数,代表一个用户ID,因此在路由注册时只需要注册 /users/:id 这一个动态路径,就可覆盖了所有用户的这一类路由请求,举几个例子说明:
1
2
3
4
5
6
7
8
|
Pattern: /users/:id

/users/123         匹配 id = 123
/users/哈哈         匹配 id= 哈哈
/users/123/        不匹配,在浏览器中自动重定向匹配 id = 123, 禁止自动重定向后 将不匹配
/users/123/go      不匹配
/users/            不匹配
/users             不匹配
|
对于 Gin路径中 的匹配都是字符串,它是不区分数字、字母和汉字的,都匹配。
还需要说明的是,Gin的路由是单一的,不能有重复。比如这里注册了 /users/:id, 那么就不能再注册匹配 /users/:id模式的路由,比如 /users/list,否则程序将报如下错误:
1
|
panic: 'list' in new path '/users/list' conflicts with existing wildcard ':id' in existing prefix '/users/:id'
|
- 星号
* 路由参数
上面介绍的是 冒号: 的路由参数,这种路由参数最常用。还有一种不常用的就是星号 * 类型的参数,表示匹配所有,匹配的是一个 / 开头的路径字符串。
以 /users/*id 为例:
1
2
3
4
5
6
7
8
9
|
Pattern: /users/*id

/users/123         匹配 id = /123
/users/123/        匹配 id = /123/
/users/123/45      匹配 id = /123/45
/users/123/45/     匹配 id = /123/45/
/users/            匹配 id = /
/users/哈哈         匹配 id= /哈哈
/users             不匹配,在浏览器中自动重定向匹配 id = /, 禁止自动重定向后 将不匹配
|
- 动态路由参数获取
Gin 框架的 gin.Context 提供了
Param 方法来从路由路径中获取动态路由相应的动态参数值。如下示例:
 1
 2
 3
 4
 5
 6
 7
 8
 9
10
11
12
13
14
15
16
17
18
19
20
21
|
package main

import (
    "github.com/gin-gonic/gin"
)

func main() {
    r := gin.Default()
    r.RedirectTrailingSlash = false // 禁止自动重定向

    //r.GET("/users/:id", func(c *gin.Context) {
    r.GET("/users/*id", func(c *gin.Context) {
        id := c.Param("id")
        c.String(200, "The user id is  %s", id)
    })
    r.GET("/users", func(c *gin.Context) {
        c.String(200, "The user id is  /users")
    })

    r.Run()
}
|
这里要特别说明一点的是,如果用浏览器访问 http://localhost:8080/users,会被重定向到 http://localhost:8080/users/。
重定向的根本原因在于 /users 没有匹配的路由,但是有匹配 /users/ 的路由,所以就会被重定向到/users/。可以注册一个 /users 路由看是否会冲突来验证下。
以上自动重定向的原理,得益于 gin.RedirectTrailingSlash 等于 true 的配置。如果把它改为false就不会自动重定向了。
2.3 Gin 的分组路由 及 其原理
在开发定义路由的时候,可能会遇到很多部分重复的路由, 或者有时因为业务需要,一些相同前缀的 路由path 具有一些相同的操作,gin 为这些类型的路由 提供的解决方案就是分组路由。
分组的原因有很多,比如基于模块化,把同样模块的放在一起,比如基于版本,把相同版本的API放一起,便于使用。在有的框架中,分组路由也被称之为命名空间。
假如我们现在要升级新版本APi,但是旧的版本又要保留以兼容老用户。那么使用Gin就可以这么做:
 1
 2
 3
 4
 5
 6
 7
 8
 9
10
11
12
13
14
15
16
17
18
19
20
21
22
23
|
func main() {
    r := gin.Default()

    //V1版本的API
    v1Group := r.Group("/v1")
    v1Group.GET("/users", func(c *gin.Context) {
        c.String(200, "/v1/users")
    })
    v1Group.GET("/products", func(c *gin.Context) {
        c.String(200, "/v1/products")
    })

    //V2版本的API
    v2Group := r.Group("/v2")
    v2Group.GET("/users", func(c *gin.Context) {
        c.String(200, "/v2/users")
    })
    v2Group.GET("/products", func(c *gin.Context) {
        c.String(200, "/v2/products")
    })

    r.Run(":8080")
}
|
只需要通过Group方法就可以生成一个分组,然后用这个分组来注册不同路由,用法和我们直接使用r变量一样,非常简单。这里为了便于阅读,一般都是把不同分组的,用{}括起来。
 1
 2
 3
 4
 5
 6
 7
 8
 9
10
11
12
13
14
15
16
17
18
19
|
v1Group := r.Group("/v1")
{
    v1Group.GET("/users", func(c *gin.Context) {
        c.String(200, "/v1/users")
    })
    v1Group.GET("/products", func(c *gin.Context) {
        c.String(200, "/v1/products")
    })
}

v2Group := r.Group("/v2")
{
    v2Group.GET("/users", func(c *gin.Context) {
        c.String(200, "/v2/users")
    })
    v2Group.GET("/products", func(c *gin.Context) {
        c.String(200, "/v2/products")
    })
}
|
不光可以定义一个分组路由,还可以在这个分组路由中再添加一个分组路由,达到分组路由嵌套的目的,这种业务场景也不少,比如:
1
2
3
|
/v1/admin/users
/v1/admin/manager
/v1/admin/photo
|
V1版本下的admin模块,使用Gin可以这么实现。
 1
 2
 3
 4
 5
 6
 7
 8
 9
10
11
12
|
v1AdminGroup := v1Group.Group("/admin")
{
    v1AdminGroup.GET("/users", func(c *gin.Context) {
        c.String(200, "/v1/admin/users")
    })
    v1AdminGroup.GET("/manager", func(c *gin.Context) {
        c.String(200, "/v1/admin/manager")
    })
    v1AdminGroup.GET("/photo", func(c *gin.Context) {
        c.String(200, "/v1/admin/photo")
    })
}
|
如上代码,再调用一次Group生成一个分组路由即可,就是这么简单,通过这种方式你还可以继续嵌套。
分组路由原理解析
先来看看最开始用的 GET方法:
1
2
3
|
func (group *RouterGroup) GET(relativePath string, handlers ...HandlerFunc) IRoutes {
    return group.handle("GET", relativePath, handlers)
}
|
第一个参数relativePath,这是一个相对路径,也就是我们传给Gin的是一个相对路径,那么是相对谁的呢?
1
2
3
4
5
6
|
func (group *RouterGroup) handle(httpMethod, relativePath string, handlers HandlersChain) IRoutes {
    absolutePath := group.calculateAbsolutePath(relativePath)
    handlers = group.combineHandlers(handlers)
    group.engine.addRoute(httpMethod, absolutePath, handlers)
    return group.returnObj()
}
|
通过 absolutePath := group.calculateAbsolutePath(relativePath) 这句代码,可以看出是相对当前的这个group(方法接收者)的。
现在calculateAbsolutePath方法的源代码暂时不看,回过头来看Group这个生成分组路由的方法。
1
2
3
4
5
6
7
|
func (group *RouterGroup) Group(relativePath string, handlers ...HandlerFunc) *RouterGroup {
    return &RouterGroup{
        Handlers: group.combineHandlers(handlers),
        basePath: group.calculateAbsolutePath(relativePath),
        engine:   group.engine,
    }
}
|
这里要注意的是,通过gin.Default()生成的gin.Engine其实包含一个RouterGroup(嵌套组合),所以它可以用RouterGroup的方法。
Group方法又生成了一个*RouterGroup,这里最重要的就是basePath,它的值是group.calculateAbsolutePath(relativePath),和刚刚暂停的分析的方法一样,既然这样,就来看看这个方法吧。
1
2
3
|
func (group *RouterGroup) calculateAbsolutePath(relativePath string) string {
    return joinPaths(group.basePath, relativePath)
}
|
就是一个基于当前RouterGroup的basePath的路径拼接,所以通过Group方法改变新生成RouterGroup中的basePath,就达到了路由分组的目的。
同时因为多次调用Group方法,都是基于上一个RouterGroup的basePath拼接成下一个RouterGroup的basePath,也就达到了路由分组嵌套的目的。
需要注意的是 gin.Engine(匿名内嵌了 RouterGroup) 对象本身就是一个路由组,对应的 basePath 是 /,根节点。 这是一种非常棒的代码实现方式,简单的代码,是强大的功能。
RouterGroup 的数据结构:
 1
 2
 3
 4
 5
 6
 7
 8
 9
10
11
|
type RouterGroup struct {
    // 路由组处理函数链,其下路由的函数链将结合路由组和自身的函数组成最终的函数链
    // 其中handler方法的第一参数必须为 gin.Context类型
    Handlers HandlersChain
    // 路由组的基地址,一般是其下路由的公共地址
    basePath string
    // 路由组所属的Engine,这里构成了双向引用
    engine *Engine
    // 该路由组是否位于根节点,基于RouterGroup.Group创建路由组时此属性为false
    root bool
}
|
RouterGroup 路由组对象中有一个很重要的字段,即 Handlers,用于收集该路由组下注册的 middleware函数。在运行时,会按顺序执行HandlersChain中的注册的函数。
1
2
3
4
5
|
type HandlerFunc func(*Context)

// HandlersChain defines a HandlerFunc slice.
// NOTE: 路由处理函数链,运行时会根据索引先后顺序依次调用
type HandlersChain []HandlerFunc
|
2.4 Gin 的路由查找 —— 方法树
Tips: 方法树(前缀树)注释参考,
- https://github.com/amosir/gin-study/blob/master/tree.go
- https://zhuanlan.zhihu.com/p/611116090
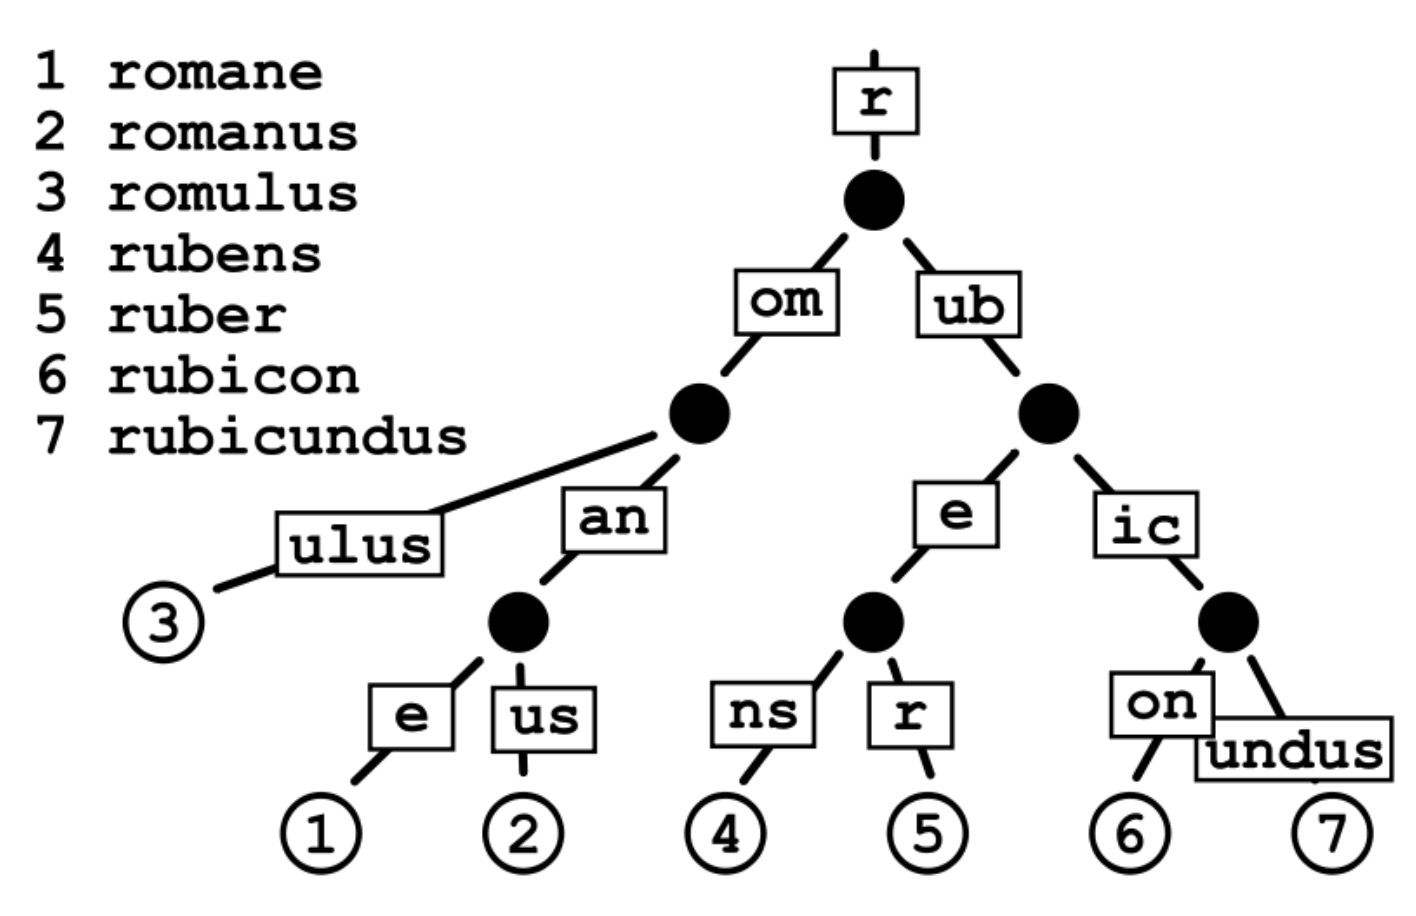
Gin 的路由查找是基于 httprouter 实现的,它的方法树是一颗压缩前缀树(Trie tree),如下图所示,是空间优化版本的前缀树,它会寻找路径相同的前缀,在相同前缀处产生分裂,把相同前缀作为父节点,而分裂处后的路径则作为父节点的子节点,比如对于 romane 和 ruber,它会分裂为 r,omane 和 uber 三个节点,其中 r 为父节点,其余两者则是它的分别两个子节点:
Engine 的 trees(Slice)中元素(方法树)的节点数据结构如下:
 1
 2
 3
 4
 5
 6
 7
 8
 9
10
11
12
13
14
15
16
17
18
19
20
21
22
23
24
25
26
27
28
29
30
31
32
33
34
35
36
37
|
// gin.go
package gin
type Engine struct {
    ...
	trees  methodTrees
    ...
}

// tree.go
package gin

type nodeType uint8
const (
	static nodeType = iota
	root
	param
	catchAll
)

type node struct {
	path      string        // 当前节点路径的值(路径部分前缀)
	indices   string        // 包含子节点首字符的前缀索引,比如 r 下游两个子节点 om 和 ub,则 r 节点的 indices 为 ou
	wildChild bool          // 当前节点是否有一个带参数的子节点
	nType     nodeType      // 节点类型,可为static,root,param 或 catchAll
	priority  uint32        // 当前节点的权重值,如果当前节点底下的处理函数越多,则它的值越大,优先被匹配到
    // child nodes, at most 1 :param style node at the end of the array
	children  []*node       // 当前节点下的子节点列表
	handlers  HandlersChain
	fullPath  string        // 当前节点完全路径的值(路径完整前缀)
}

type methodTree struct {
	method string
	root   *node
}

type methodTrees []methodTree
|
在 2.2 小节 介绍到,在路由注册时,Eninge 对象调用其 addRoute 方法注册路由,在 Engine 的 addRoute 中实际是 调用方法树的 addRoute 方法 创建(注册)路由(路径)节点,对于一个要在树上添加的路径,其代码实现如下:
  1
  2
  3
  4
  5
  6
  7
  8
  9
 10
 11
 12
 13
 14
 15
 16
 17
 18
 19
 20
 21
 22
 23
 24
 25
 26
 27
 28
 29
 30
 31
 32
 33
 34
 35
 36
 37
 38
 39
 40
 41
 42
 43
 44
 45
 46
 47
 48
 49
 50
 51
 52
 53
 54
 55
 56
 57
 58
 59
 60
 61
 62
 63
 64
 65
 66
 67
 68
 69
 70
 71
 72
 73
 74
 75
 76
 77
 78
 79
 80
 81
 82
 83
 84
 85
 86
 87
 88
 89
 90
 91
 92
 93
 94
 95
 96
 97
 98
 99
100
101
102
103
104
105
106
107
108
109
110
111
112
113
114
115
116
117
118
119
120
121
122
123
124
125
126
127
128
129
130
131
132
133
134
135
136
137
138
139
140
|
//tree.go
package gin

// addRoute adds a node with the given handle to the path.
// Not concurrency-safe!
func (n *node) addRoute(path string, handlers HandlersChain) {
	fullPath := path
	n.priority++

	// Empty tree
    // 如果树上不存在任何节点,则把当前节点作为根节点,插入到方法树上,节点路径为传入路径。
	if len(n.path) == 0 && len(n.children) == 0 {
		n.insertChild(path, fullPath, handlers)
		n.nType = root
		return
	}

	parentFullPathIndex := 0

    // 否则,遍历树的节点
walk:
	for {
		// Find the longest common prefix.
		// This also implies that the common prefix contains no ':' or '*'
		// since the existing key can't contain those chars.
        // 计算当前节点的路径和传入路径的最长公共前缀位置。
        // 比如已存在一个节点路径为 /romane/,传入路径 /ruber/ 与它的最长公共前缀位置是 2,意味着它们具有共同前缀为 /s
		i := longestCommonPrefix(path, n.path)

		// Split edge
        // 如果公共前缀的长度小于当前节点的长度(/r 长度小于 /romane ),则在当前节点产生分裂,生成一个路径为 omane/ 的子节点,
        // 把新生成的节点添加到当前节点的 children,并把首字符 e 添加到当前节点的前缀索引 indices 中,
        // 将当前节点的路径改为前缀路径(从 /romane/ 变为 /r)
		if i < len(n.path) {
			child := node{
				path:      n.path[i:],  // 生成一个路径为 omane/ 的子节点
				wildChild: n.wildChild,
				nType:     static,
				indices:   n.indices,
				children:  n.children,
				handlers:  n.handlers,
				priority:  n.priority - 1,
				fullPath:  n.fullPath,
			}

			n.children = []*node{&child} // 把新生成的节点添加到当前节点的 children
			// []byte for proper unicode char conversion, see #65
			n.indices = bytesconv.BytesToString([]byte{n.path[i]})
			n.path = path[:i]
			n.handlers = nil
			n.wildChild = false
			n.fullPath = fullPath[:parentFullPathIndex+i]
		}

		// Make new node a child of this node
        // 如果公共前缀的长度小于传入节点的长度(/r 长度小于 /ruber ),则在传入路径中产生一个新的路径(uber/),
        // 插入到当前节点的 children,把首字符 u 添加到当前节点的前缀索引 indices 中
		if i < len(path) {
            // 1. 这里存在一种情况是,如果当前节点的子节点是一个参数节点(当前节点的wildChild 为 true),
            // 那么会检查传入路径是否也是相同的参数节点下的路径,比如当前节点路径为 /user/:user_id,
            // 传入节点路径为 /user/:user_id/name,如果满足条件的话,则继续到子节点(:user_id) 下创建新的路径,
            // 否则若在参数节点下定义了其他路径,如/user/name,则会直接发生 panic 返回,
            // 因为当前路径下存在冲突(一个参数节点不能跟一个非参数节点位于同级)。
            // 2. 如果当前节点是一个参数节点,(如 :user_id,在此节点下创建路径为 /name),
            // 并且路径以 / 开头且当前节点只存在一个子节点,则当前节点指向子节点,继续进行路径分裂。
            // 3. 如果当前节点存在多个子节点,则从 indices 查找匹配路径首字符的子节点,继续往子节点遍历。
            // 4. 否则直接往当前节点上创建子节点。(例如:定义路由为 /user/:user_id/,则 :user_id 会存在一个子节点为 /,
            // 这时候 /name 就需要跟 / 节点进行路径分裂插入到 :user_id 下,如果定义路由为 /user/:user_id,
            // 则直接插入到 :user_id 下就好了)
			path = path[i:]
			c := path[0]

			// '/' after param
			if n.nType == param && c == '/' && len(n.children) == 1 {
				parentFullPathIndex += len(n.path)
				n = n.children[0]
				n.priority++
				continue walk
			}

			// Check if a child with the next path byte exists
			for i, max := 0, len(n.indices); i < max; i++ {
				if c == n.indices[i] {
					parentFullPathIndex += len(n.path)
					i = n.incrementChildPrio(i)
					n = n.children[i]
					continue walk
				}
			}

			// Otherwise insert it
			if c != ':' && c != '*' && n.nType != catchAll {
				// []byte for proper unicode char conversion, see #65
				n.indices += bytesconv.BytesToString([]byte{c})
				child := &node{
					fullPath: fullPath,
				}
				n.addChild(child)
				n.incrementChildPrio(len(n.indices) - 1)
				n = child
			} else if n.wildChild {
				// inserting a wildcard node, need to check if it conflicts with the existing wildcard
				n = n.children[len(n.children)-1]
				n.priority++

				// Check if the wildcard matches
				if len(path) >= len(n.path) && n.path == path[:len(n.path)] &&
					// Adding a child to a catchAll is not possible
					n.nType != catchAll &&
					// Check for longer wildcard, e.g. :name and :names
					(len(n.path) >= len(path) || path[len(n.path)] == '/') {
					continue walk
				}

				// Wildcard conflict
				pathSeg := path
				if n.nType != catchAll {
					pathSeg = strings.SplitN(pathSeg, "/", 2)[0]
				}
				prefix := fullPath[:strings.Index(fullPath, pathSeg)] + n.path
				panic("'" + pathSeg +
					"' in new path '" + fullPath +
					"' conflicts with existing wildcard '" + n.path +
					"' in existing prefix '" + prefix +
					"'")
			}

			n.insertChild(path, fullPath, handlers)
			return
		}

		// Otherwise add handle to current node
		if n.handlers != nil {
			panic("handlers are already registered for path '" + fullPath + "'")
		}
		n.handlers = handlers
		n.fullPath = fullPath
		return
	}
}
|
举一个例子来演示方法树的创建过程,如下所示,假设现在定义了一些 HTTP 路由函数:
1
2
3
4
5
6
7
8
|
r := gin.Default()
    r.GET("/search/", func(ctx *gin.Context){})
    r.GET("/support/", func(ctx *gin.Context){})
    r.GET("/blog/", func(ctx *gin.Context){})
    r.GET("/blog/:post/", func(ctx *gin.Context){})
    r.GET("/about-us/", func(ctx *gin.Context){})
    r.GET("/about-us/team/", func(ctx *gin.Context){})
    r.Run()
|
方法节点的创建过程如下:
- 首先只有一颗空树,这时候插入 /search/,它就变成了树的根节点:
- 接下来插入 /support/,因为它与 /search/ 具有最长公共前缀 /s,所以此处产生路径分裂,生成两个子节点 earch/ 以及 upport/,它们具有共同的父节点,即公共前缀 /s:
1
2
3
4
|
tree
└── /s
├── earch/
└── upport/
|
- 接着插入 /blog/,因为它与 /s 具有最长公共前缀 /,所以此处分裂为 s 和 blog/ 两个子节点,父节点都为 /
1
2
3
4
5
6
|
tree
└── /
├── /s
| ├── earch/
| └── upport/
└── blog/
|
- 接下来插入 /blog/:post/,它与 / 具有最长公共前缀 /,因此要插入的路径为 blog/:post/,然后根据当前节点 / 的 indices 判断与路径的首字符 b 匹配的节点为 blog/,于是就把当前节点指向blog/,因为 blog/ 下不存在子节点,所以在 blog/ 下创建路径为 :post 的 wildcard 节点,因为 :post/ 以 / 结尾,因此在 wildcard 节点下创建一个路径为 / 的子节点。
1
2
3
4
5
6
7
8
|
tree
└── /
    ├── /s
    |   ├── earch/
    |   └── upport/
    └── blog/
└── post
└── /
|
- 最后插入 /about-us/ 和 /about-us/team/ 节点,最终路由树的结构如下:
1
2
3
4
5
6
7
8
9
10
|
tree
└── /
├── /s
│ ├── earch/
│ └── upport/
├── blog/
│ └── post
│ └── /
└── about-us/
└── team/
|
现在在再回到怎么根据一个传入路径在一棵树上找到对应的路由信息,方法树的 getValue 方法定义如下,它主要进行了几个步骤:
- 如果当前节点路径与传入路径相等
- 如果当前节点的处理函数不为空,结束并返回路由信息。
- 如果当前节点不存在处理函数,则尝试寻找路径+’/‘上是否注册了处理函数,如果有则尝试进行重定向。
- 如果当前节点路径与传入路径具有相同前缀
- 如果当前节点不存在一个带参数的子节点,则查找并遍历到下一个匹配的子节点。
- 否则如果当前节点存在一个带参数的子节点,则解析请求参数并记录到返回值的 params 里,如果路径后还有子路径(如:/user/123/name),则继续尝试匹配当前节点下的子节点,直至完全匹配返回。
- 如果当前节点路径与传入路径不匹配,则尝试去寻找路径+”/“的节点是否存在,不存在则返回 HTTP 404 或 405 错误。
对于上面例子中创建的方法树,访问 /blog/123/ 这个路径:
- 因为 /blog/123/ 与根节点 / 具有相同前缀 /,继续查找 blog/123/ 发现它的首字符存在与根节点的 indices 上,移动当前节点到 blog/ 上。
- 因为 blog/123/ 与 blog/ 具有相同前缀 blog/,这时候继续在路径上查找 123/ ,因为当前节点的子节点是一个参数节点(:post),所以移动当前节点到 :post 上,并进行请求参数的解析。因为 123/ 的匹配参数的结束位置不是 123/ 的末尾处,因此移动当前节点到 / 上,继续匹配 / 路径。
- 这时候在 / 节点上发现路径跟节点前缀完全匹配,并且当前节点上注册了处理函数,因此返回匹配的路由信息。
如果访问的是 /blog/123 的话,则会出现首次会匹配失败(因为 :post 上不存在注册函数),但是这时候发现这个节点下存在一个子节点,于是会尝试给路径末尾加上一个反斜杠,变为 /blog/123/,再做一遍重定向,这时候就会再走一遍上面匹配的过程,就能匹配成功了。
当成功匹配到路由后,会调用 Context 的 Next 方法开始循环执行调用链上的函数,这时候一次完整的 HTTP 调用就结束了。
三、HTTP 请求(request)传递(交换)数据在 Gin 中的实现
3.1 HTTP 请求(request)传递(交换)数据的方式
HTTP 请求(request)可以使用 URL的URI(路径)、URL的query、HTTP请求的Header 及 HTTP请求的Body 四种方式作为载体进行请求数据的传递(交换),其中:
- 使用 URL的URI(路径)、URL的query、HTTP请求的Header 这三种载体传递数据的方式相对简单固定并且只适合传递少量数据;
- 使用 HTTP请求的Body 作为载体传递数据则比较灵活多变,这种方式支持多种协议数据的传递,比如 json、xml、form表单、protobuf、甚至是二进制加密数据、文件数据等等,适合传递复杂、大量的数据;
Gin中的 Context 实现(支持)了两种方式来获取 HTTP 请求(request)传数的据递,分别是 直接手动解析获取 HTTP 请求(request)传递(交换)的数据 的方式 和 使用绑定器自动将 HTTP 请求(request)传递(交换)的数据绑定 struct 对象 的方式。
3.2 直接手动解析获取 HTTP 请求(request)传递的数据 及 实现原理
1、context.Param 方法 获取 HTTP 请求 URI路径参数 及 其原理分析
context.Param 方法 获取 HTTP 请求 URI路径参数 在 前面 2.2 小节的 “路由(Routing)实现” 中已经介绍。
 1
 2
 3
 4
 5
 6
 7
 8
 9
10
11
12
13
14
15
16
17
18
|
package main
import (
"github.com/gin-gonic/gin"
)
func main() {
r := gin.Default()
r.RedirectTrailingSlash = false // 禁止自动重定向
//r.GET("/users/:id", func(c *gin.Context) {
r.GET("/users/*id", func(c *gin.Context) {
id := c.Param("id")
c.String(200, "The user id is %s", id)
})
r.Run()
}
|
context.Param 类方法 的实现如下
 1
 2
 3
 4
 5
 6
 7
 8
 9
10
11
12
13
14
15
16
17
18
19
20
21
22
23
24
25
26
27
|
// Param returns the value of the URL param.
// It is a shortcut for c.Params.ByName(key)
//
// router.GET("/user/:id", func(c *gin.Context) {
// // a GET request to /user/john
// id := c.Param("id") // id == "/john"
// // a GET request to /user/john/
// id := c.Param("id") // id == "/john/"
// })
func (c *Context) Param(key string) string {
return c.Params.ByName(key)
}
// AddParam adds param to context and
// replaces path param key with given value for e2e testing purposes
// Example Route: "/user/:id"
// AddParam("id", 1)
// Result: "/user/1"
func (c *Context) AddParam(key, value string) {
// c.Params 为 Slice 类型 type Params []Param
// Param 类型为结构体:
// type Param struct {
// Key string
// Value string
// }
c.Params = append(c.Params, Param{Key: key, Value: value})
}
|
2、context.Query 类方法 获取 HTTP 请求的 URL查询参数(query parames) 及 其原理分析
Url查询参数(query parames) 也可以简称为 URL参数,是存在于 HTTP请求的 URL中的 一个或多个 key-value键值对,它们是 URL 中以 ? 为起点,后面为 k=v&k1=v1&k2=v2( k-v 对之间使用 & 进行串联)这样的字符串,查询参数按 key 的特征分为以下可几类:
- QueryString 类型:key为字符串且不相同的 query parames;
- QueryArray 类型:key为字符串且相同的 query parames;
- QueryMap 类型:key为字点索引 query parames;
如下面示例中:
1
2
3
|
http://localhost:8080/?id=123&name=mak&sex=m QueryString
http://localhost:8080/?id=123&id=23&id=13 QueryArray
http://localhost:8080/?user[id]=123&user[name]=mak&user[sex]=m QueryMap
|
? 后面的 k-v键值对 就是这个 Url 的查询参数(query parames),每个 k-v 对之间使用 & 进行串联。
context.Query 类方法列表:
| 查询参数 |
说明 |
| Query |
获取key对应的值,不存在为空字符串 |
| GetQuery |
多返回一个key是否存在的结果 |
| QueryArray |
获取key对应的数组,不存在返回一个空数组 |
| GetQueryArray |
多返回一个key是否存在的结果 |
| QueryMap |
获取key对应的map,不存在返回空map |
| GetQueryMap |
多返回一个key是否存在的结果 |
| DefaultQuery |
key不存在的话,可以指定返回的默认值 |
获取 QueryString 类型的 URL查询参数
Gin 框架的 gin.Context 提供了简便的 Query方法 来获取查询参数的值,和动态路由参数相似,只需要知道查询参数的key(参数名)就可以调用 Query 函数获取到 key 相对应的 value,
1
2
3
4
5
6
7
8
9
10
11
12
13
14
|
package main
import (
"github.com/gin-gonic/gin"
)
func main() {
r := gin.Default()
r.GET("/user", func(c *gin.Context) {
c.String(200, c.Query("id"))
})
r.Run()
}
|
gin.Context 的 Query方法 提供了获取对应key的值的能力,如果该key不存在,则返回"“字符串。如果对于一些数字参数,比如id如果返回为空的话,在进行字符串转数字的时候会报错,这时候,可以通过 DefaultQuery方法 指定一个默认值,或者 还可通过 GetQuery方法判断key是否操作并获取值,先关实现如下:
 1
 2
 3
 4
 5
 6
 7
 8
 9
10
11
12
13
14
15
16
17
18
19
20
21
22
23
24
25
26
27
28
29
30
31
32
33
34
35
36
37
38
39
40
41
42
43
44
45
46
47
48
49
50
51
52
53
54
55
56
57
58
59
60
|
// gin/context.go
// Query returns the keyed url query value if it exists,
// otherwise it returns an empty string `("")`.
// It is shortcut for `c.Request.URL.Query().Get(key)`
//
// GET /path?id=1234&name=Manu&value=
// c.Query("id") == "1234"
// c.Query("name") == "Manu"
// c.Query("value") == ""
// c.Query("wtf") == ""
func (c *Context) Query(key string) (value string) {
value, _ = c.GetQuery(key)
return
}
// DefaultQuery returns the keyed url query value if it exists,
// otherwise it returns the specified defaultValue string.
// See: Query() and GetQuery() for further information.
//
// GET /?name=Manu&lastname=
// c.DefaultQuery("name", "unknown") == "Manu"
// c.DefaultQuery("id", "none") == "none"
// c.DefaultQuery("lastname", "none") == ""
func (c *Context) DefaultQuery(key, defaultValue string) string {
if value, ok := c.GetQuery(key); ok {
return value
}
return defaultValue
}
// GetQuery is like Query(), it returns the keyed url query value
// if it exists `(value, true)` (even when the value is an empty string),
// otherwise it returns `("", false)`.
// It is shortcut for `c.Request.URL.Query().Get(key)`
//
// GET /?name=Manu&lastname=
// ("Manu", true) == c.GetQuery("name")
// ("", false) == c.GetQuery("id")
// ("", true) == c.GetQuery("lastname")
func (c *Context) GetQuery(key string) (string, bool) {
if values, ok := c.GetQueryArray(key); ok {
return values[0], ok
}
return "", false
}
func (c *Context) GetQueryArray(key string) ([]string, bool) {
c.getQueryCache() //缓存所有的键值对
if values, ok := c.queryCache[key]; ok && len(values) > 0 {
return values, true
}
return []string{}, false
}
func (c *Context) getQueryCache() {
if c.queryCache == nil {
c.queryCache = c.Request.URL.Query()
}
}
|
从以上的实现代码中,可以看到最终的实现都在 GetQueryArray方法中,找到对应的 key就返回对应的[]string,返回就返回空数组。
这里Gin进行了优化,通过缓存所有的键值对,提升代码的查询效率。这里缓存的queryCache本质上是url.Values,也是一个map[string][]string。
1
|
type Values map[string][]string
|
其中 c.Request.URL.Query() 这个方法就是把 ?k=v&k1=v1&k2=v2 这类查询键值对转换为 map[string][]string,所以还是很耗性能的,这里Gin采用了缓存的做法提高了性能挺好,这也是Gin成为性能最快的Golang Web 框架的一些细节优化。
获取 QueryArray 类型的 URL查询参数
在实际的业务开发中,有些业务是多选的,比如一个活动有多个人参加,一个问题有多个答案等等,对于这类业务功能来说,如果是通过查询参数提交的,它们的URL大概这样 ?a=b&a=c&a=d, 它们的query参数的key值都一样,但是对应的value不一样。这类URL查询参数,就是一个数组,Gin 的 gin.Context 提供了 QueryArray方法 来获取 这类 query 参数,如下示例:
1
2
3
4
5
6
7
8
|
func main() {
r := gin.Default()
r.GET("/", func(c *gin.Context) {
c.JSON(200, c.QueryArray("ids"))
})
r.Run()
}
|
运行代码,在浏览器里访问 http://localhost:8080/?ids=12&ids=23,会看到如下信息:
QueryArray方法 也有对应的 GetQueryArray方法,区别在于返回对应的key是否存在:
 1
 2
 3
 4
 5
 6
 7
 8
 9
10
11
12
13
14
15
16
17
18
19
20
21
22
23
24
25
26
|
// gin/context.go
// QueryArray returns a slice of strings for a given query key.
// The length of the slice depends on the number of params with the given key.
func (c *Context) QueryArray(key string) (values []string) {
values, _ = c.GetQueryArray(key)
return
}
func (c *Context) initQueryCache() {
if c.queryCache == nil {
if c.Request != nil {
c.queryCache = c.Request.URL.Query()
} else {
c.queryCache = url.Values{}
}
}
}
// GetQueryArray returns a slice of strings for a given query key, plus
// a boolean value whether at least one value exists for the given key.
func (c *Context) GetQueryArray(key string) (values []string, ok bool) {
c.initQueryCache()
values, ok = c.queryCache[key]
return
}
|
获取 QueryMap 类型的 URL查询参数
QueryMap其实就是把满足一定格式的URL查询参数,转换为一个map,假设有 a,b,c 三个 user,他们对应的 id 是 123,456,789,那么用map的方式表示,这种格式类似于:
1
|
http://localhost:8080/users?ids[a]=123&ids[b]=456&ids[c]=789
|
从以上URL看,关键在于key,这个key必须符合map的定义,[]外面的必须相同,也就是ids这个map变量名,[]里面的,也就是map的key不能相同,这样就满足了Gin定义的把URL查询参数转换为map的格式定义。
1
2
3
4
5
6
7
8
|
func main() {
r := gin.Default()
r.GET("/users", func(c *gin.Context) {
c.JSON(200, c.QueryMap("ids"))
})
r.Run()
}
|
获取map的方法很简单,把ids作为key即可。现在运行代码,访问http://localhost:8080/user?ids[a]=123&ids[b]=456&ids[c]=789,就会看到如下信息:
1
|
{"a":"123","b":"456","c":"789"}
|
同样的 GetQueryMap 和 QueryMap 方法是一样的,只是返回了对应的key是否存在。
1
2
3
4
5
6
7
8
9
10
11
12
13
14
15
16
17
18
19
20
21
22
23
24
25
26
27
|
// QueryMap returns a map for a given query key.
func (c *Context) QueryMap(key string) (dicts map[string]string) {
dicts, _ = c.GetQueryMap(key)
return
}
// GetQueryMap returns a map for a given query key, plus a boolean value
// whether at least one value exists for the given key.
func (c *Context) GetQueryMap(key string) (map[string]string, bool) {
c.initQueryCache()
return c.get(c.queryCache, key)
}
// get is an internal method and returns a map which satisfies conditions.
func (c *Context) get(m map[string][]string, key string) (map[string]string, bool) {
dicts := make(map[string]string)
exist := false
for k, v := range m {
if i := strings.IndexByte(k, '['); i >= 1 && k[0:i] == key {
if j := strings.IndexByte(k[i+1:], ']'); j >= 1 {
exist = true
dicts[k[i+1:][:j]] = v[0]
}
}
}
return dicts, exist
}
|
QueryMap是通过GetQueryMap,最终都是c.get这个方法实现。它有两个参数,一个m其实就是缓存的所有查询参数键值对queryCache,另外一个就是我们要找的key
因为Gin定义的map的URL特殊格式化,所以这里需要判断是否有[],如果有的话,并且key匹配,那么这个键值对就是我们需要找的,把它存在dicts即可,最终返回的是这个dicts。
这里等于是,Gin帮我们做了包装,可以更好的把特殊格式的URL转为map,提升了我们使用的效率,不过这种方法不常用,如果有特别的需要可以使用。
注意这里同样用到了getQueryCache进行缓存提高性能。
3、context.PostForm 类方法 获取 HTTP 请求的 URL查询参数(query parames) 及 其原理分析
除了通过URL查询参数(query parameters)提交数据到服务器外,常用的还有通过 Form表单 的方式。Form表单相比URL查询参数,用户体验好,可以承载更多的数据,尤其是文件上传,所以也更为方便。
Form表单,我们不会陌生,比如input文本框、密码框等等,可以输入一些数据,然后点击「保存」、「提交」等按钮,把数据提交到服务器的。
对于Form表单来说,有两种提交方式 GET 和 POST。其中 GET方式就是上面介绍的URL查询参数的方式,参考即可获得对应的参数键值对,这篇文章主要介绍POST的方式的表单,而Gin处理的也是这种表单。
PostForm 类方法 和 查询参数的 Query类方法 相似,如果对应的key不存在则返回空字符串。
Gin PostForm系列方法
PostForm系列方法 和 Query类方法 一样,对于表单的参数接收,Gin也提供了一系列的方法,它们的用法和查询参数的一样。
| 查询参数 |
Form表单 |
说明 |
| Query |
PostForm |
获取key对应的值,不存在为空字符串 |
| GetQuery |
GetPostForm |
多返回一个key是否存在的结果 |
| QueryArray |
PostFormArray |
获取key对应的数组,不存在返回一个空数组 |
| GetQueryArray |
GetPostFormArray |
多返回一个key是否存在的结果 |
| QueryMap |
PostFormMap |
获取key对应的map,不存在返回空map |
| GetQueryMap |
GetPostFormMap |
多返回一个key是否存在的结果 |
| DefaultQuery |
DefaultPostForm |
key不存在的话,可以指定返回的默认值 |
Post 请求传值 获取 form 表单数据
Gin 对于 Form表单 数据的获取也非常简单,Gin 为提供了和获取URL查询参数相似的系列 Form 方法。
1
2
3
4
5
6
7
8
9
10
11
12
13
|
func main() {
r := gin.Default()
r.POST("/adduser", func(c *gin.Context) {
username := c.PostForm("username")
password := c.PostForm("password")
age := c.DefaultPostForm("age", "20")
c.JSON(200, gin.H{
"usernmae": username, "password": password, "age": age,
})
})
r.Run()
}
|
在这个Gin示例中,使用 PostForm 方法来获取相应的键值对,它接收一个key,也就是 html 中 input 这类表单标签的 name 属性值。
运行这段代码,然后打开终端输入 curl -d username=Tom password=123 http://localhost:8080/ 回车,就会看到打印的如下信息:
1
|
{"usernmae": "Tom", "password": "123", "age": "20",}
|
这里通过 curl 工具来模拟 POST请求,当然也可以使用像 Postman 这种比较容易操作的可视化工具。
关于PostForm系列方法的实现原理和Query系列类似,并且遵循 Query-GetQuery-GetQueryArray 这么一个内部调用顺序。
 1
 2
 3
 4
 5
 6
 7
 8
 9
10
11
12
13
14
15
16
17
18
19
20
21
22
23
24
25
26
27
28
29
30
31
32
33
34
35
36
37
38
39
40
41
42
43
44
45
46
47
48
49
50
51
52
53
54
55
56
57
58
59
60
61
62
63
64
65
66
67
68
69
70
71
72
73
74
75
76
77
78
79
80
81
82
83
84
85
86
87
|
// PostForm returns the specified key from a POST urlencoded form or multipart form
// when it exists, otherwise it returns an empty string `("")`.
func (c *Context) PostForm(key string) (value string) {
value, _ = c.GetPostForm(key)
return
}
// DefaultPostForm returns the specified key from a POST urlencoded form or multipart form
// when it exists, otherwise it returns the specified defaultValue string.
// See: PostForm() and GetPostForm() for further information.
func (c *Context) DefaultPostForm(key, defaultValue string) string {
if value, ok := c.GetPostForm(key); ok {
return value
}
return defaultValue
}
// GetPostForm is like PostForm(key). It returns the specified key from a POST urlencoded
// form or multipart form when it exists `(value, true)` (even when the value is an empty string),
// otherwise it returns ("", false).
// For example, during a PATCH request to update the user's email:
//
// email=mail@example.com --> ("mail@example.com", true) := GetPostForm("email") // set email to "mail@example.com"
// email= --> ("", true) := GetPostForm("email") // set email to ""
// --> ("", false) := GetPostForm("email") // do nothing with email
func (c *Context) GetPostForm(key string) (string, bool) {
if values, ok := c.GetPostFormArray(key); ok {
return values[0], ok
}
return "", false
}
// PostFormArray returns a slice of strings for a given form key.
// The length of the slice depends on the number of params with the given key.
func (c *Context) PostFormArray(key string) (values []string) {
values, _ = c.GetPostFormArray(key)
return
}
func (c *Context) initFormCache() {
if c.formCache == nil {
c.formCache = make(url.Values)
req := c.Request
if err := req.ParseMultipartForm(c.engine.MaxMultipartMemory); err != nil {
if !errors.Is(err, http.ErrNotMultipart) {
debugPrint("error on parse multipart form array: %v", err)
}
}
c.formCache = req.PostForm
}
}
// GetPostFormArray returns a slice of strings for a given form key, plus
// a boolean value whether at least one value exists for the given key.
func (c *Context) GetPostFormArray(key string) (values []string, ok bool) {
c.initFormCache()
values, ok = c.formCache[key]
return
}
// PostFormMap returns a map for a given form key.
func (c *Context) PostFormMap(key string) (dicts map[string]string) {
dicts, _ = c.GetPostFormMap(key)
return
}
// GetPostFormMap returns a map for a given form key, plus a boolean value
// whether at least one value exists for the given key.
func (c *Context) GetPostFormMap(key string) (map[string]string, bool) {
c.initFormCache()
return c.get(c.formCache, key)
}
// get is an internal method and returns a map which satisfies conditions.
func (c *Context) get(m map[string][]string, key string) (map[string]string, bool) {
dicts := make(map[string]string)
exist := false
for k, v := range m {
if i := strings.IndexByte(k, '['); i >= 1 && k[0:i] == key {
if j := strings.IndexByte(k[i+1:], ']'); j >= 1 {
exist = true
dicts[k[i+1:][:j]] = v[0]
}
}
}
return dicts, exist
}
|
这些方法的关键点在于 initFormCache 缓存Form表单的数据,接下来就是根据key获取对应的值了。
从以上实现代码可以看到,formCache 表单缓存其实也是一个url.Values,通过调用http.Request的ParseMultipartForm对提交的表单解析,获得里面的数据保存在http.Request的PostForm字段中,最后从req.PostForm获取表单数据,赋值给c.formCache表单缓存即可。
这里需要注意的是保存表单缓存的内存大小,Gin默认给的是32M,通过const defaultMultipartMemory = 32 « 20 // 32 MB可以看出。
如果觉得不够,可以提前通过修改 MaxMultipartMemory 的值增加,比如:
1
2
|
r := gin.Default()
r.MaxMultipartMemory = 50 * (2 << 20)
|
4、context.FormFile 类方法 获取 HTTP 请求 上传的文件数据 及 其原理分析
1
2
3
4
5
6
7
8
9
10
11
12
13
14
15
16
|
func main() {
r := gin.Default()
// 给表单限制上传大小 (默认 32 MiB)
// router.MaxMultipartMemory = 8 << 20 // 8 MiB
router.POST("/upload", func(c *gin.Context) {
// 单文件
file, _ := c.FormFile("file")
log.Println(file.Filename)
// 上传文件到指定的路径
// c.SaveUploadedFile(file, dst)
c.String(http.StatusOK, fmt.Sprintf("'%s' uploaded!", file.Filename))
})
r.Run()
}
|
FormFile 及 SaveUploadedFile 方法的实现如下:
 1
 2
 3
 4
 5
 6
 7
 8
 9
10
11
12
13
14
15
16
17
18
19
20
21
22
23
24
25
26
27
28
29
30
31
32
33
34
35
36
|
// FormFile returns the first file for the provided form key.
func (c *Context) FormFile(name string) (*multipart.FileHeader, error) {
if c.Request.MultipartForm == nil {
if err := c.Request.ParseMultipartForm(c.engine.MaxMultipartMemory); err != nil {
return nil, err
}
}
f, fh, err := c.Request.FormFile(name)
if err != nil {
return nil, err
}
f.Close()
return fh, err
}
// SaveUploadedFile uploads the form file to specific dst.
func (c *Context) SaveUploadedFile(file *multipart.FileHeader, dst string) error {
src, err := file.Open()
if err != nil {
return err
}
defer src.Close()
if err = os.MkdirAll(filepath.Dir(dst), 0750); err != nil {
return err
}
out, err := os.Create(dst)
if err != nil {
return err
}
defer out.Close()
_, err = io.Copy(out, src)
return err
}
|
3.3 绑定器自动将 HTTP 请求(request)传递的数据绑定 struct 对象 及 实现原理
Gin 框架自带的 binding 库 也称为 模型绑定,是一个非常好用的反序列化库,它支持把 HTTP 请求 Body里的 FormData、JSON、XML、YALM、TOML、Protobuf、MessagePack 等格式的数据 和 URL中的 URI路径参数(param)、查询(query)参数、HTTP Headers 等绑定到 Go 的 Struct 指针对象上,并且还把 go-playground/validator 库整合了进来,提供参数验证功能。
Tips: MessagePack 简称 msgpack,是一种高效的二进制序列化格式标准。它的数据格式与json类似,但是在存储时对数字、多字节字符、数组等都做了很多优化,减少了无用的字符,二进制格式,也保证不用字符化带来额外的存储空间的增加。所以它比JSON更快、更小(小的整数会被编码成一个字节,短的字符串仅仅只需要比它的长度多一字节的大小)。
MessagePack简介及使用:https://blog.csdn.net/Dream_Weave/article/details/117263332
Gin 的 binding库 能支持这么多样格式的请求数据绑定,是因为它为每一类数据绑定都提供了专用的 绑定器,这些绑定器统一都遵守 Binding 这个 interface 定义的规范(实现了这个接口):
1
2
3
4
5
6
7
8
9
|
// Binding describes the interface which needs to be implemented for binding the
// data present in the request such as JSON request body, query parameters or the form POST.
type Binding interface {
Name() string
// Bind 方法要实现的功能是把 http.Request 里的请求数据按照约定格式读出来
// 绑定(解析)到 any(interface{}类型)参数传入的结构体指针对象上
Bind(*http.Request, any) error
}
|
比如发送一个 HTTP POST请求,请求体中常用到的数据交换格式是 JSON 或者 Form表单 这两种。针对这两种请求的数据交换格式 Gin 框架 binding 库中提供了 JSON绑定器 和 FormData的绑定器,用来把请求体里的数据解析出来绑定到结构体指针对象上。
 1
 2
 3
 4
 5
 6
 7
 8
 9
10
11
12
13
14
15
16
17
18
19
20
21
22
23
24
25
26
27
28
29
|
// JOSN 绑定器 实现
type jsonBinding struct{}
func (jsonBinding) Name() string {
return "json"
}
func (jsonBinding) Bind(req *http.Request, obj any) error {
if req == nil || req.Body == nil {
return errors.New("invalid request")
}
return decodeJSON(req.Body, obj)
}
// FormData 绑定器
type formBinding struct{}
func (formBinding) Name() string {
return "form"
}
func (formBinding) Bind(req *http.Request, obj any) error {
if err := req.ParseForm(); err != nil {
return err
}
if err := req.ParseMultipartForm(defaultMemory); err != nil && !errors.Is(err, http.ErrNotMultipart) {
return err
}
if err := mapForm(obj, req.Form); err != nil {
return err
}
return validate(obj)
}
|
对各种类型 HTTP请求 数据绑定的 绑定器 实现详见 Gin 项目下的 binding 包(https://github.com/gin-gonic/gin/tree/master/binding)。
实现了 HTTP请求 数据的 绑定器 后,在需要解析绑定的地方调用对应绑定器,即可实现将 HTTP 请求数据 绑定 到结构体对象的功能,例如 gin.Context 结构体(https://github.com/gin-gonic/gin/blob/master/context.go)实现的 ShouldBindWith 方法:
1
2
3
4
5
|
// ShouldBindWith binds the passed struct pointer using the specified binding engine.
// See the binding package.
func (c *Context) ShouldBindWith(obj any, b binding.Binding) error {
return b.Bind(c.Request, obj)
}
|
ShouldBindWith 接收一个Binding 接口类型的绑定器对象 b,然后调用 b 的 Bind 方法 将 HTTP请求数据 绑定(解析) 到 any(interface{})类型的 obj(必须是一个结构体指针)对象上。
Tips: 在使用 Gin 中的 模型绑定 时,绑定器对象的 obj(interface{}类型)对象必须是一个struct指针对象,这个 struct 中要绑定的所有字段需设置相应的tag。例如,要使用 JSON 绑定一个字段时,需要设置该字段标签 tag 为 json:"fieldname"。
Gin 的 Context 为请求数据绑定提供了两大类方法:在命名上以 Bind 为前缀和以 ShouldBind 区分,这两大类方法在行为上有些差异。
- Bind(Must bind)类的绑定方法 在绑定数据失败的时候,Gin 框架会直接返回
HTTP 400 Bad Request 错误,其中 Bind 方法会自动根据请求 Header 中的 Content-Type 判断要使用哪种绑定器解析绑定数据,而 BindJSON、BindXML 这类的方法则是直接使用对应的绑定器。Bind 类方法的实现如下:
 1
 2
 3
 4
 5
 6
 7
 8
 9
10
11
12
13
14
15
16
17
18
19
20
21
22
23
24
25
26
27
28
29
30
31
32
33
34
35
36
37
38
39
40
41
42
43
44
45
46
47
48
49
50
51
52
53
54
55
56
57
58
59
60
61
62
63
64
|
// Bind checks the Method and Content-Type to select a binding engine automatically,
// Depending on the "Content-Type" header different bindings are used, for example:
//
// "application/json" --> JSON binding
// "application/xml" --> XML binding
//
// It parses the request's body as JSON if Content-Type == "application/json" using JSON or XML as a JSON input.
// It decodes the json payload into the struct specified as a pointer.
// It writes a 400 error and sets Content-Type header "text/plain" in the response if input is not valid.
func (c *Context) Bind(obj any) error {
b := binding.Default(c.Request.Method, c.ContentType())
return c.MustBindWith(obj, b)
}
// BindJSON is a shortcut for c.MustBindWith(obj, binding.JSON).
func (c *Context) BindJSON(obj any) error {
return c.MustBindWith(obj, binding.JSON)
}
// BindXML is a shortcut for c.MustBindWith(obj, binding.BindXML).
func (c *Context) BindXML(obj any) error {
return c.MustBindWith(obj, binding.XML)
}
// BindQuery is a shortcut for c.MustBindWith(obj, binding.Query).
func (c *Context) BindQuery(obj any) error {
return c.MustBindWith(obj, binding.Query)
}
// BindYAML is a shortcut for c.MustBindWith(obj, binding.YAML).
func (c *Context) BindYAML(obj any) error {
return c.MustBindWith(obj, binding.YAML)
}
// BindTOML is a shortcut for c.MustBindWith(obj, binding.TOML).
func (c *Context) BindTOML(obj any) error {
return c.MustBindWith(obj, binding.TOML)
}
// BindHeader is a shortcut for c.MustBindWith(obj, binding.Header).
func (c *Context) BindHeader(obj any) error {
return c.MustBindWith(obj, binding.Header)
}
// BindUri binds the passed struct pointer using binding.Uri.
// It will abort the request with HTTP 400 if any error occurs.
func (c *Context) BindUri(obj any) error {
if err := c.ShouldBindUri(obj); err != nil {
c.AbortWithError(http.StatusBadRequest, err).SetType(ErrorTypeBind) //nolint: errcheck
return err
}
return nil
}
// MustBindWith binds the passed struct pointer using the specified binding engine.
// It will abort the request with HTTP 400 if any error occurs.
// See the binding package.
func (c *Context) MustBindWith(obj any, b binding.Binding) error {
if err := c.ShouldBindWith(obj, b); err != nil {
c.AbortWithError(http.StatusBadRequest, err).SetType(ErrorTypeBind) //nolint: errcheck
return err
}
return nil
}
|
这些方法都属于 MustBindWith方法的具体实例调用,如果发生绑定错误,则请求终止,并触发 c.AbortWithError(400, err).SetType(ErrorTypeBind)。响应状态码被设置为 400`` 并且 Content-Type 被设置为 text/plain; charset=utf-8。如果在此之后尝试设置响应状态码,Gin会输出日志 [GIN-debug] [WARNING] Headers were already written. Wanted to override status code 400 with 422`,如果希望更灵活地控制绑定,可以考虑使用 ShouldBind 等效方法。
- ShouldBind 类的绑定方法 在绑定数据失败的时候,会返回 error ,交给程序自己去处理错误。同样 ShouldBind 与 ShouldBindJSON、ShouldBindXML 这些方法的区别是 ShouldBind 会自动根据Header头中的 Content-Type 判断要使用哪种绑定器解析绑定数据,如果团队内开发规范里约定了请求 Content-Type 都是 JSON 的话,直接选用后者(ShouldBindJSON )更为合理。ShouldBind 类方法的实现如下:
1
2
3
4
5
6
7
8
9
10
11
12
13
14
15
16
17
18
19
20
21
22
23
24
25
26
27
28
29
30
31
32
33
34
35
36
37
38
39
40
41
42
43
44
45
46
47
48
49
50
51
52
53
54
55
56
57
58
|
// ShouldBind checks the Method and Content-Type to select a binding engine automatically,
// Depending on the "Content-Type" header different bindings are used, for example:
//
// "application/json" --> JSON binding
// "application/xml" --> XML binding
//
// It parses the request's body as JSON if Content-Type == "application/json" using JSON or XML as a JSON input.
// It decodes the json payload into the struct specified as a pointer.
// Like c.Bind() but this method does not set the response status code to 400 or abort if input is not valid.
func (c *Context) ShouldBind(obj any) error {
b := binding.Default(c.Request.Method, c.ContentType())
return c.ShouldBindWith(obj, b)
}
// ShouldBindJSON is a shortcut for c.ShouldBindWith(obj, binding.JSON).
func (c *Context) ShouldBindJSON(obj any) error {
return c.ShouldBindWith(obj, binding.JSON)
}
// ShouldBindXML is a shortcut for c.ShouldBindWith(obj, binding.XML).
func (c *Context) ShouldBindXML(obj any) error {
return c.ShouldBindWith(obj, binding.XML)
}
// ShouldBindQuery is a shortcut for c.ShouldBindWith(obj, binding.Query).
func (c *Context) ShouldBindQuery(obj any) error {
return c.ShouldBindWith(obj, binding.Query)
}
// ShouldBindYAML is a shortcut for c.ShouldBindWith(obj, binding.YAML).
func (c *Context) ShouldBindYAML(obj any) error {
return c.ShouldBindWith(obj, binding.YAML)
}
// ShouldBindTOML is a shortcut for c.ShouldBindWith(obj, binding.TOML).
func (c *Context) ShouldBindTOML(obj any) error {
return c.ShouldBindWith(obj, binding.TOML)
}
// ShouldBindHeader is a shortcut for c.ShouldBindWith(obj, binding.Header).
func (c *Context) ShouldBindHeader(obj any) error {
return c.ShouldBindWith(obj, binding.Header)
}
// ShouldBindUri binds the passed struct pointer using the specified binding engine.
func (c *Context) ShouldBindUri(obj any) error {
m := make(map[string][]string)
for _, v := range c.Params {
m[v.Key] = []string{v.Value}
}
return binding.Uri.BindUri(m, obj)
}
// ShouldBindWith binds the passed struct pointer using the specified binding engine.
// See the binding package.
func (c *Context) ShouldBindWith(obj any, b binding.Binding) error {
return b.Bind(c.Request, obj)
}
|
特别注意,无论是 Bind 还是 ShouldBind 类的绑定方法,都只能读取一次请求体进行绑定,如果有需要 多次读取请求体字节流的需求的话,可以使用ShouldBindBodyWith 方法,该方法会把请求体字节流拷贝一份放在 Gin 的 Context对象里。
 1
 2
 3
 4
 5
 6
 7
 8
 9
10
11
12
13
14
15
16
17
18
19
20
21
|
// ShouldBindBodyWith is similar with ShouldBindWith, but it stores the request
// body into the context, and reuse when it is called again.
//
// NOTE: This method reads the body before binding. So you should use
// ShouldBindWith for better performance if you need to call only once.
func (c *Context) ShouldBindBodyWith(obj any, bb binding.BindingBody) (err error) {
var body []byte
if cb, ok := c.Get(BodyBytesKey); ok {
if cbb, ok := cb.([]byte); ok {
body = cbb
}
}
if body == nil {
body, err = io.ReadAll(c.Request.Body)
if err != nil {
return err
}
c.Set(BodyBytesKey, body)
}
return bb.BindBody(body, obj)
}
|
在定义绑定的结构体 tag 时,可以指定必须绑定的字段,如果一个字段的 tag 加上了 binding:"required",但绑定时是空值, Gin 会报错。
示例:
 1
 2
 3
 4
 5
 6
 7
 8
 9
10
11
12
13
14
15
16
17
18
19
20
21
22
23
24
25
26
27
28
29
30
31
32
33
34
35
36
37
38
39
40
41
42
43
44
45
46
47
48
49
50
51
52
53
54
55
56
57
58
59
60
61
62
63
64
65
66
|
// 绑定 JSON
type Login struct {
User string `form:"user" json:"user" xml:"user" binding:"required"`
Password string `form:"password" json:"password" xml:"password" binding:"required"`
}
func main() {
router := gin.Default()
// 绑定 JSON ({"user": "manu", "password": "123"})
router.POST("/loginJSON", func(c *gin.Context) {
var json Login
if err := c.ShouldBindJSON(&json); err != nil {
c.JSON(http.StatusBadRequest, gin.H{"error": err.Error()})
return
}
if json.User != "manu" || json.Password != "123" {
c.JSON(http.StatusUnauthorized, gin.H{"status": "unauthorized"})
return
}
c.JSON(http.StatusOK, gin.H{"status": "you are logged in"})
})
// 绑定 XML (
// <?xml version="1.0" encoding="UTF-8"?>
// <root>
// <user>manu</user>
// <password>123</password>
// </root>)
router.POST("/loginXML", func(c *gin.Context) {
var xml Login
if err := c.ShouldBindXML(&xml); err != nil {
c.JSON(http.StatusBadRequest, gin.H{"error": err.Error()})
return
}
if xml.User != "manu" || xml.Password != "123" {
c.JSON(http.StatusUnauthorized, gin.H{"status": "unauthorized"})
return
}
c.JSON(http.StatusOK, gin.H{"status": "you are logged in"})
})
// 绑定 HTML 表单 (user=manu&password=123)
router.POST("/loginForm", func(c *gin.Context) {
var form Login
// 根据 Content-Type Header 推断使用哪个绑定器。
if err := c.ShouldBind(&form); err != nil {
c.JSON(http.StatusBadRequest, gin.H{"error": err.Error()})
return
}
if form.User != "manu" || form.Password != "123" {
c.JSON(http.StatusUnauthorized, gin.H{"status": "unauthorized"})
return
}
c.JSON(http.StatusOK, gin.H{"status": "you are logged in"})
})
// 监听并在 0.0.0.0:8080 上启动服务
router.Run(":8080")
}
|
1
2
3
4
|
curl -v -X POST \
http://localhost:8080/loginJSON \
-H 'content-type: application/json' \
-d '{ "user": "manu", "password": 123456}'
|
编写自定义绑定器
如果 Gin 框架默认提供的绑定器还满足不了项目需求,还可以通过编写自定义绑定器的方式实现需求,和这些现成的绑定器一样,自定义绑定器也要实现 Binding 接口:
1
2
3
4
5
6
7
8
9
10
11
|
type selfBinding struct {
}
// 返回绑定器的名称
func (selfBinding) Name() string {
return "self"
}
// 解析请求,绑定数据到对象
func (s selfBinding) Bind(request *http.Request, i interface{}) error {
return s.Decode(request.Body, i)
}
|
在使用 selfBinding 时 还可以再封装一个 BingSelf、ShouldBindSelf 这类的方法,也可直接用 ShouldBindWith 方法就行。
binding 除了能完成请求数据到结构体类型指针的绑定 — 专业名词叫模型绑定,在进行模型绑定时,binding 库还顺带能对每个要绑定参数的进行验证,下面我们进入到这部分的内容。
模型绑定的一些示例:
- 绑定 POST 请求体里的JSON数据
 1
 2
 3
 4
 5
 6
 7
 8
 9
10
11
12
13
14
15
16
17
18
19
20
21
22
23
24
25
26
27
28
29
30
|
type queryBody struct {
Name string `json:"name"`
Age int `json:"age"`
Sex int `json:"sex"`
}
func bindBody(context *gin.Context){
var q queryBody
err:= context.ShouldBindJSON(&q)
if err != nil {
context.JSON(http.StatusBadRequest,gin.H{
"result":err.Error(),
})
return
}
context.JSON(http.StatusOK,gin.H{
"result":"绑定成功",
"body": q,
})
}
func main() {
router := gin.Default()
// 路由
router.POST("/binding/body",bindBody)
// 监听并在 0.0.0.0:8080 上启动服务
router.Run(":8080")
}
// 请求示例
// curl -X POST -d '{"name":"laoshi","age":18,"sex": 1}' http://localhost:8080/binding/body
|
- 绑定URL路径的位置参数
1
2
3
4
5
6
7
8
9
10
11
12
13
14
15
16
17
18
19
20
21
22
23
24
25
26
27
28
29
|
type queryUri struct {
Id int `uri:"id"`
Name string `uri:"name"`
}
func bindUri(context *gin.Context){
var q queryUri
err:= context.ShouldBindUri(&q)
if err != nil {
context.JSON(http.StatusBadRequest,gin.H{
"result":err.Error(),
})
return
}
context.JSON(http.StatusOK,gin.H{
"result":"绑定成功",
"uri": q,
})
}
func main() {
router := gin.Default()
// 路由
router.GET("/binding/:id/:name", bindUri)
// 监听并在 0.0.0.0:8080 上启动服务
router.Run(":8080")
}
// 请求示例
// curl -X GET http://localhost:8080/binding/100/XiaoHua
|
- 绑定URL查询字符串
 1
 2
 3
 4
 5
 6
 7
 8
 9
10
11
12
13
14
15
16
17
18
19
20
21
22
23
24
25
26
27
28
29
|
type queryParameter struct {
Year int `form:"year"`
Month int `form:"month"`
}
func bindQuery(context *gin.Context){
var q queryParameter
err:= context.ShouldBindQuery(&q)
if err != nil {
context.JSON(http.StatusBadRequest,gin.H{
"result":err.Error(),
})
return
}
context.JSON(http.StatusOK,gin.H{
"result":"绑定成功",
"query": q,
})
}
func main () {
router := gin.Default()
// 路由
router.GET("/binding/query", bindQuery)
// 监听并在 0.0.0.0:8080 上启动服务
router.Run(":8080")
}
// 请求示例
// curl -X GET http://localhost:8080/binding/query?year=2022&mnotallow=10
|
- 绑定HTTP Header
1
2
3
4
5
6
7
8
9
10
11
12
13
14
15
16
17
18
19
20
21
22
23
24
25
26
27
28
29
|
type queryHeader struct {
Token string `header:"token"`
Platform string `header:"platform"`
}
func bindHeader(context *gin.Context){
var q queryHeader
err := context.ShouldBindHeader(&q)
if err != nil {
context.JSON(http.StatusBadRequest,gin.H{
"result":err.Error(),
})
return
}
context.JSON(http.StatusOK,gin.H{
"result":"绑定成功",
"header": q,
})
}
func main () {
router := gin.Default()
// 路由
router.GET("/binding/header",bindHeader)
// 监听并在 0.0.0.0:8080 上启动服务
router.Run(":8080")
}
// 请求示例
// curl -H "token: a1b2c3" -H "platform: 5" -XGET http://localhost:8080/binding/header
|
- 绑定FormData
Gin 没有单独的 ShouldBindForm 这样的方法,如果是要把请求里的FormData 绑定到自定义结构体的指针,可以使用 ShouldBind方法,这个方法支持根据 Header 里的 “Content-Type” 绑定各种格式的请求数据。
 1
 2
 3
 4
 5
 6
 7
 8
 9
10
11
12
13
14
15
16
17
18
19
20
21
22
23
24
25
|
type InfoParam struct {
A string `form:"a" json:"a"`
B int `form:"b" json:"b"`
}
func Results(c *gin.Context) {
var info InfoParam
// If `GET`, only `Form` binding engine (`query`) used.
// If `POST`, first checks the `content-type` for `JSON` or `XML`, then uses `Form` (`form-data`).
// See more at https://github.com/gin-gonic/gin/blob/master/binding/binding.go#L48
if err := c.ShouldBind(&info); err != nil {
c.JSON(400, gin.H{ "error": err.Error() })
return
}
c.JSON(200, gin.H{ "data": info.A })
}
func main () {
router := gin.Default()
// 路由
router.GET("/binding/formdata", Results)
// 监听并在 0.0.0.0:8080 上启动服务
router.Run(":8080")
}
|
3.4 绑定 HTTP 请求(request)传递(交换)的数据 的参数验证
Gin 的 binding 库 在数据绑定过程中提供的参数验证功能,在其内部其实是依赖 go-playgound/validator 库实现的,validator 是一个非常强大的验证库,提供了各种验证功能,这篇文章先把平常用 binding 库怎么做参数验证给大家说一下,提供一些示例供大家学习和开发的时候参考,后面的文章再深入地详细介绍 validator 库。
用 binding 库进行参数验证,需要在要绑定数据的模型的 Struct Tag 中,使用binding标签进行各种验证规则的说明。最基础的验证就是要求参数必填,如果不使用验证器的话,大概率是要在程序里写一堆类似下面的 if 判断(参数必填这个基础判断):
1
2
3
|
if name == "" {
return errors.New("name is empty")
}
|
使用 binding 验证功能,可以在声明绑定参数的结构体模型的时候,对于必填参数对应的字段,在其 binding 标签里用require进行声明,例如:
1
2
3
4
5
|
type queryBody struct {
Name string `json:"name" binding:"require"`
Age int `json:"age"`
Sex int `json:"sex"`
}
|
这样在后续使用 ShouldBindJSON 这类方法进行解析请求、绑定数据到模型的时候,对于声明了 require binding 的 Name 字段,会强制验证对应参数是不是为空,Age 和 Sex 这两个字段由于未声明为 require binding,无序做非空校验。
现在市面上各种软件,在注册时或者功能需要总是要求用户提交手机号、邮箱地址、国家地区码之类的数据,那么在开发时就经常需要对这类数据进行验证,通常的做法是在项目里维护一个工具类,通过正则表达式之类的手段对这些输入项进行验证。
binding 库在这方面也有考虑,看下下面这个模型结构体的声明:
1
2
3
4
5
6
7
|
type Body struct {
FirstName string `json:"firstName" binding:"required"`
LastName string `json:"lastName" binding:"required"`
Email string `json:"email" binding:"required,email"`
Phone string `json:"phone" binding:"required,e164"`
CountryCode string `json:"countryCode" binding:"required,iso3166_1_alpha2"`
}
|
在结构体字段的 Tag 中除了上面已经学过的require,在 Email、Phone 和 CountryCode 字段的 Tag 中,增加了其他几个验证规则。
- email: 使用通用正则表达式验证电子邮件。
- e164: 使用国际 E.164 标准验证电话。
- iso3166_1_alpha2: 使用 ISO-3166-1 两字母标准验证国家代码。
Tips: 国内的手机号是 +86开头,不确定能验证所有国内的手机号,毕竟这几年还有虚拟电信运营商,阿里、京东什么的都能发手机号,如果公司有成型的手机号验证规则,可以封装个自定义验证规则,注册到binding的验证器中,注册验证规则这部分内容后面讲。
可以使用下面的JSON样本,写程序验证一下 binding 的这几个验证规则:
1
2
3
4
5
6
7
|
{
"firstName": "John",
"lastName": "Mark",
"email": "jmark@example.com",
"phone": "+11234567890",
"countryCode": "US"
}
|
字符串输入验证
对于字符串参数,除了验证参数是否为空外,在写代码的时候经常还会按照系统的业务对一些字符串进行验证,比如手机类产品的SKU,在SKU码中都会包含MB关键字,产品编码都以PC关键字前缀开头等等。
对于这种更复杂的字符串参数验证,binding 也提供了可以直接用的验证规则。比如刚才的场景,验证产品码和SKU码的时候,可以在声明的模型结构体中加上这几个标签:
1
2
3
4
|
type MobileBody struct {
ProductCode string `json:"productCode" binding:"required,startswith=PC,len=10"`
SkuCode string `json:"skuCode" binding:"required,cnotallow=MB,len=12"`
}
|
下面是几个经常会用到的字符串验证规则:
| Tag |
Description |
Usage Example |
| uppercase |
只允许包含大些字母 |
binding:“uppercase” |
| lowercase |
只允许包含大些字母 |
binding:“lowercase” |
| contains |
包含指定的子串 |
binding:“cnotallow=key” |
| alphanum |
只允许包含英文字母和数字 |
binding:“alphanum” |
| alpha |
只允许包含英文字母 |
binding:“alpha” |
| endswith |
字符串以指定子串结尾 |
binding:“endswith=.go” |
| startwith |
字符串以指定子串开始 |
binding:“startswith=PC” |
字段组合验证和比较
binding 的验证器提供了几个标签用于跨字段比较和字段内比较。跨字段比较即将特定字段与另一个字段的值进行比较,字段内比较说的是字段值与硬编码值进行比较,例如:
1
2
3
4
|
type Body struct {
Width int `json:"width" binding:"required,gte=1,lte=100,gtfield=Height"`
Height int `json:"height" binding:"required,gte=1,lte=100"`
}
|
上面 Body 这个模型声明中,对 Width 和 Height 会分别进行以下项约束:
- Width: 必填,1 <= Width <= 100,Width 大于 Height 字段的值。
- Height: 必填,1<= Height <= 100。
验证时间是否有效
请求里存放时间的字段也是经常需要验证参数的老大难,一般都是偷懒就验证个不为空就行了,要验证是否是有效时间还得用time.Time 库进行解析,不过使用 binding 库参数验证的时候,这部分工作就可以交给 binding 库来做了。
binding 库提供了一个 time_format 标签,通过该标签可以自由指定参数里时间的格式,从而完成时间验证,如下所示:
1
2
3
4
|
type Body struct {
StartDate time.Time `form:"start_date" binding:"required,ltefield=EndDate" time_format:"2006-01-02"`
EndDate time.Time `form:"end_date" binding:"required" time_format:"2006-01-02"`
}
|
上面 Body 这个验证规则指定了:
- StratDate:必填,小于EndDate字段的值,参数中的格式为:“2006-01-02” 即 “yyy-mm-dd” 的形式
time_format 标签 和 binding标签 可以组合使用,上面例子中的格式为:“2006-01-02”,如果时间参数为 “yyy-mm-dd hh:mm:ss” 的格式,把标签的值指定成"2006-01-02 15:04:05"就行,跟 Go 时间对象的Format函数用的模版一样。
自定义验证
有时候官方提供的验证器并不能满足我们的所有需求, Gin 的binding库也支持用户注册自定义验证器,其实这个功能是 binding 使用的 validator 库提供的,下面用例子看一下怎么注册自定义验证器,官方的验证器里提供了一个oneof验证
1
2
3
|
type ReqBody struct {
Color string `json:"name" uri:"name" binding:"oneof=red blue pink"`
}
|
上面使用这个 oneof 验证的规则是:只能是列举出的标签值red blue pink值其中一个,这些值必须是数值或字符串,每个值以空格分隔。
现在假设要自定义一个验证叫做 notoneof,验证规则是:字段的值不能是指定值中的任一个,与oneof验证的规则恰恰相反。
给 Gin 注册这个自定义验证,可以这么写:
1
2
3
4
5
6
7
8
9
10
11
12
13
14
15
16
17
18
19
20
21
22
23
24
|
func main() {
route := gin.Default()
...
// 获取验证引擎,并类型转换成*validator.Validate
if v, ok := binding.Validator.Engine().(*validator.Validate); ok {
// 注册notoneof的验证函数
v.RegisterValidation("notoneof", func(fl validator.FieldLevel) bool {
// split values using ` `. eg. notoneof=bob rob job
// 用空格分割ontoneof的值 比如:notoneof=red blue pink
match:=strings.Split(fl.Param()," ")
// 把用反射获取的字段值由reflect.Value 转为 string
value:=fl.Field().String()
for _,s:=range match {
// 判断字段值是否等于notoneof指定的那些值
if s==value {
return false
}
}
return true
})
}
...
route.Run(":8080")
}
|
上面这个自定义验证的实现可以分成下面几步:
- 获取Gin binding 使用的验证器引擎:binding.Validator.Engine().(*validator.Validate);
- 接着使用验证引擎的 RegisterValidation 方法注册notoneof验证,以及对应的验证函数;
- 通过 validator.FieldLevel 可以获得反射的结构体以及验证里的所有信息和帮助函数;
- FieldLevel.Param()获取为当前验证设置的所有参数(结构体标签在notoneof中指定的值);
- FieldLevel.Field()获取当前验证的结构体字段的反射值,这样就可以进一步转化字段值
具体这个notoneof验证函数的实现逻辑,看上面代码里的注释。
注册自定义验证这部分的内容,相当于是 validator 库相关的知识,除了注册自定义验证外,在搭建框架的时候还需要自定义验证器的错误返回格式、把错误信息根据语言翻译成中文等等,这部分内容其实跟使用哪个Web框架关系不大,都是 validator 库的功能,具体的可以详细学习 validator 库相关知识进行了解。
四、Gin 中间件详解
4.1 Gin 中间件
Gin 框架允许开发者在处理请求的过程中,加入用户自己的钩子(Hook)函数。这个钩子函数就叫 中间件(Middle Ware),中间件非常适合处理一些公共的业务逻辑,比如登录认证、权限校验、限流、数据过滤、黑白名单、数据分页、记录日志、耗时统计等等。
在Gin的整个实现中,中间件可谓是Gin的精髓。一个个的中间件组成一条中间件链,对HTTP Request请求进行拦截处理,实现了代码的解耦和分离,并且中间件之间相互不用感知到,每个中间件只需要处理自己需要处理的事情即可。
Gin 中的中间件必须是一个 gin.HandlerFunc 类型的函数,配置路由的时候可以传递多个 gin.HandlerFunc 类型 的回调函数。中间件要放在最后一个回调函数的前面,如下所示:
1
2
3
4
5
6
7
8
9
10
11
12
13
14
15
16
|
// 中间件函数
func MiddleWare1(c *gin.Context) {
fmt.Println("init middle ware ")
}
func MiddleWare2(c *gin.Context) {
fmt.Println("init middle ware ")
}
func main() {
g := g.Default()
// 中间件要放在最后一个回调函数的前面
g.GET("/", MiddleWare1, MiddleWare2, func (c *gin.Context) {
c.String(http.StatusOK, "Handle func...")
})
g.Run()
}
|
Gin 中的中间件 按影响范围可以分为 全局中间件、路由组中间件、局部中间件 三类:
- 全局中间件:全局中间件 Gin 框架实例(Engine)根路由 调用 Use 方法注册的中间件,该类中间件对所有 HTTP 请求 生效,如下面 Default 方法中注册的
Logger(), Recovery() 两个中间件;
- 路由组中间件:路由组中间件 在特定路由组中所有路由处理函数之前执行的中间件,是分组路由 调用 Use 方法注册的中间件,该类 中间件 只对 该分组路由及其子孙分组路由生效,如下面 Default 方法中注册的
Logger(), Recovery() 两个中间件;
- 局部中间件:局部中间件 也称作 路由中间件,是指在特定路由处理函数之前执行的中间件,是在注册路由时 在 Get、Post 等方法的最后一个 HandlerFunc(之后一个是请求处理方法) 之前的 HandlerFunc,这类中间件只对当前路由生效, 如上面的 GET 方法调用中的
MiddleWare1 和 MiddleWare2 两个参数;
全局中间件示例:
调用 IRoutes 接口的的 Use方法(RouterGroup实现了该方法,Engine继承自RouterGroup) 添加中间件,例如 gin.Default() 函数中 使用的 Logger(), Recovery() 两个中间件:
1
2
3
4
5
6
|
func Default() *Engine {
debugPrintWARNINGDefault()
engine := New()
engine.Use(Logger(), Recovery())
return engine
}
|
Default函数会默认绑定两个已经准备好的中间件,它们就是 Logger 和 Recovery,帮助打印日志输出和painc处理。
路由组中间件:
1
2
3
4
5
6
7
8
9
10
11
12
13
14
15
16
17
18
19
20
21
22
23
|
func Auth() gin.HandlerFunc {
return func(c *gin.Context) {
token := c.GetHeader("Authorization")
if token == "" {
c.AbortWithStatusJSON(http.StatusUnauthorized, gin.H{"error": "Unauthorized"})
return
}
c.Next()
}
}
func main() {
r := gin.Default()
api := r.Group("/api", Auth())
{
api.GET("/ping", func(c *gin.Context) {
c.JSON(200, gin.H{
"message": "pong",
})
})
}
r.Run()
}
|
在这个示例中,我们创建了一个名为Auth的组中间件,用于在处理/api路由组中所有路由之前验证请求头中的Authorization字段。使用api := r.Group("/api”, Auth())将Auth中间件添加到/api路由组中。
IRoutes 接口的的 Use方法(RouterGroup实现了该方法,Engine继承自RouterGroup) 方法接收一个可变参数,所以同时可以设置多个中间件。
1
2
3
4
5
|
// Use adds middleware to the group, see example code in GitHub.
func (group *RouterGroup) Use(middleware ...HandlerFunc) IRoutes {
group.Handlers = append(group.Handlers, middleware...)
return group.returnObj()
}
|
4.2 中间件的使用位置
中间件的使用顺序绝对了什么时候执行中间件,比如有三个路由: /login、/user_list 和 /news_list
/user_list 和 /news_list 需要在登陆后才可以访问,/login 不要登录认证就可访问,
这时候需要一个token认证的中间件,那这个中间件Use的位置不同会有不同影响,如下:
1
2
3
4
5
6
7
8
|
outer := gin.Default()
router.Get("/login",xxx)
router.User(MiddleWare()) // Use不能放在login的前面,不然也会对login进行拦截认证
router.Get("/user_list",xxx)
router.Get("/news_list",xxx)
|
4.3 Gin内置中间件
| 中间件 |
说明 |
| func BasicAuth(accounts Accounts) HandlerFunc |
权限认证 |
| func BasicAuthForRealm(accounts Accounts, realm string) HandlerFunc realm |
认证分组 |
| func Bind(val interface{}) HandlerFunc |
拦截请求参数并进行绑定 |
| func ErrorLogger() HandlerFunc |
错误日志处理 |
| func ErrorLoggerT(typ ErrorType) HandlerFunc |
自定义类型的错误日志处理 |
| func Logger() HandlerFunc |
日志记录 |
| func LoggerWithConfig(conf LoggerConfig) HandlerFunc |
|
| func LoggerWithFormatter(f LogFormatter) HandlerFunc |
|
| func LoggerWithWriter(out io.Writer, notlogged …string) HandlerFunc |
|
| func Recovery() HandlerFunc |
|
| func RecoveryWithWriter(out io.Writer) HandlerFunc |
|
| func WrapF(f http.HandlerFunc) HandlerFunc |
将http.HandlerFunc包装成中间件 |
| func WrapH(h http.Handler) HandlerFunc |
将http.Handler包装成中间件 |
4.4 自定义中间件
1
2
3
4
5
6
7
8
9
10
11
12
13
14
15
16
|
// 自定义中间件第1种定义方式
func MiddleWare1(ctx *gin.Context) {
fmt.Println("这是自定义中间件1")
}
// 自定义中间件第2种定义方式
func MiddleWare2() gin.HandlerFunc {
return func(ctx *gin.Context) {
fmt.Println("这是自定义中间件2")
}
}
router := gin.New()
router.Use(MiddleWare1) // 需要加括号
router.Use(MiddleWare2()) // 不需要加括号,当成参数
|
4.5 中间件中的 Next 和 Abort 方法
在定义的众多中间件,会形成一条中间件链,在中间件函数里面调用 ctx.Next(),c.Next() 后面的语句将先不执行,程序将跳转到调用链列表的下一个及后面的中间件和回调函数中执行完后,ctx.Next()返回 才执行 c.Next() 后面的语句。
- 当遇到 Next()函数 时 Next()函数取出所有的没被执行过的注册的函数都执⾏⼀遍,然后再回到本函数中,有点类似递归函数;
1
2
3
4
5
6
7
8
9
10
11
12
13
|
func CostTimeMiddleWare (c *gin.Context) {
// 请求前获取当前时间
nowTime := time.Now()
// 先去执行调用链列表的下一个及后面的其它中间件函数 及 处理函数,
// Next() 执行完后返回 再开始执行 Next() 函数后面的 语句
c.Next()
// 处理后获取消耗时间
costTime := time.Since(nowTime)
url := c.Request.URL.String()
fmt.Printf("the request URL %s cost %v\n", url, costTime)
}
|
中间件函数里面调用 ctx.Abort() 表示终止调用该请求的剩余处理程序(终止调用整个链条),中间件函数中 Abort()、整个请求的剩下回调函数(包括后面的中间件)都不执行了,直接执行该中间件函数中 Abort() 后面的语句后返回。比如:token认证没有通过,不能直接使用return返回,而是使用Abort来终止
 1
 2
 3
 4
 5
 6
 7
 8
 9
10
11
12
13
14
15
16
17
18
19
20
21
22
23
24
25
26
27
28
29
30
|
func MiddleWare1(ctx *gin.Context) {
fmt.Println("这是自定义中间件1--开始")
ctx.Next()
fmt.Println("这是自定义中间件1--结束")
}
func MiddleWare2() gin.HandlerFunc {
return func(ctx *gin.Context) {
fmt.Println("这是自定义中间件2--开始")
if 3 < 4{ // 满足条件
ctx.Abort()
}
ctx.Next()
fmt.Println("这是自定义中间件2--结束")
}
}
func MiddleWare3(ctx *gin.Context) {
fmt.Println("这是自定义中间件3--开始")
ctx.Next()
fmt.Println("这是自定义中间件3--结束")
}
router := gin.Default()
router.Use(Middleware1, Middleware2(),Middleware3)
|
4.6 常用中间示例
Tips: Gin 中间件示例 https://www.jb51.net/article/281431.htm
1、Gin 框架限流中间件
2、Gin 框架跨域中间件
3、Gin 框架数据库中间件
4、Gin 框架redis中间件
5、Gin 框架es中间件
6、Gin 框架rabbitMQ中间件
7、Gin 框架nats中间件
8、Gin 框架集成分页功能中间件
9、Gin 框架集成上传文件api接口,判断文件类型,文件大小
五、Gin 对各种数据格式响应的渲染
5.1 Gin 对响应的渲染的实现
Gin 支持多种 格式(string、josn、xml、yaml、toml、protobuf、msgpack、html等)的返回数据渲染,通过 HTTP 请求的 Context 上下文对象实现这类响应数据的渲染,例如:
1
2
3
4
5
6
7
8
9
10
11
12
13
14
15
16
17
18
19
|
r.GET("/json", func(c *gin.Context) {
aid := c.Query("aid")
// 方式一:自己拼接 JSON
c.JSON(http.StatusOK, gin.H{
"msg": "JSON"
})
})
r.GET("/structJson", func(c *gin.Context) {
// 结构体方式
var msg struct {
Username string `json:"username"`
Msg string `json:"msg"`
Age string `json:"age"`
}
msg.Username = "name1"
msg.Msg = "msg1"
msg.Age = "18"
c.JSON(200, msg)
})
|
在 HandlerFunc 中 调用 gin.Context 的 JSON 方法可以向请求端 渲染返回 JSON 数据, 其它类型的数据渲染与此相似(HTML 渲染相对复杂)
相关实现如下:
1
2
3
4
5
6
7
8
9
10
11
12
13
14
15
16
17
18
19
20
21
22
23
24
25
26
27
|
// Render writes the response headers and calls render.Render to render data.
func (c *Context) Render(code int, r render.Render) {
c.Status(code)
if !bodyAllowedForStatus(code) {
r.WriteContentType(c.Writer)
c.Writer.WriteHeaderNow()
return
}
if err := r.Render(c.Writer); err != nil {
// Pushing error to c.Errors
_ = c.Error(err)
c.Abort()
}
}
// JSON serializes the given struct as JSON into the response body.
// It also sets the Content-Type as "application/json".
func (c *Context) JSON(code int, obj any) {
c.Render(code, render.JSON{Data: obj})
}
...
// YAML serializes the given struct as YAML into the response body.
func (c *Context) YAML(code int, obj any) {
c.Render(code, render.YAML{Data: obj})
}
|
Gin 相关类型数据的渲染 实现 在Gin 的 render 包中, Context 包 调用对应的实现完成相应渲染工作。
六、Gin 的其它功能
6.1 Gin 实现请求重定向
HTTP 重定向很容易。 内部、外部重定向均支持。
- HTTP重定向(外部重定向)
1
2
3
4
5
6
7
8
9
10
11
12
13
14
15
16
17
18
19
20
21
|
/**
重定向:
1. 外部重定向,跳转到站外网站
2. 内部重定向,在本服务器内进行跳转
区别:
内部重定向,URL并没有发生变化,外部重定向,URL发生了变化,
*/
func main() {
// 创建路由
r := gin.Default()
// 绑定路由规则
r.GET("/toBaidu", func(ctx *gin.Context) {
// 状态码301
ctx.Redirect(http.StatusMovedPermanently, "https://www.baidu.com")
})
// 监听端口
r.Run(":9000")
}
|
- 路由重定向(内部重定向)
1
2
3
4
5
6
7
8
9
10
11
12
13
14
15
16
17
18
19
20
|
package main
import (
"github.com/gin-gonic/gin"
"net/http"
)
func main() {
r := gin.Default()
r.GET("/a", func(c *gin.Context) {
c.Redirect(http.StatusMovedPermanently, "/b")
})
r.GET("/b", func(c *gin.Context) {
c.JSON(http.StatusOK, gin.H{
"hello": "world",
})
})
_ = r.Run()
}
|
- 路由重定向(forward转发)
路由重定向,使用HandleContext:
 1
 2
 3
 4
 5
 6
 7
 8
 9
10
11
12
13
14
15
16
17
18
19
20
21
22
23
24
25
26
27
28
29
30
|
package main
import (
"github.com/gin-gonic/gin"
"net/http"
)
/**
路由重定,站内跳转
*/
func main() {
// 创建路由
r := gin.Default()
// 绑定路由规则
r.GET("/test1", func(ctx *gin.Context) {
// 修改请求的URI, 指定重定向的URI
ctx.Request.URL.Path ="/test2"
// 继续进行后续处理
r.HandleContext(ctx)
})
r.GET("/test2", func(ctx *gin.Context) {
ctx.JSON(http.StatusOK, gin.H{
"message": "hello i am test2",
})
})
// 监听端口
r.Run(":9000")
}
|
6.2 Gin 实现静态文件服务
- 托管一个静态文件
在项目的开发中,你可能需要这么一个功能:把服务器上的JS文件暴露出来以供访问,比如让网站调用里面的JS函数等。对于这种情形,我们可以使用Gin提供的StaticFile方法很方便的完成。
1
2
3
4
5
|
func main() {
router := gin.Default()
router.StaticFile("/adobegc.log", "/tmp/adobegc.log")
router.Run(":8080")
}
|
通过StaticFile方法,把文件/tmp/adobegc.log托管在网络上,并且设置访问路径为/adobegc.log,这样通过http://localhost:8080/adobegc.log就可以访问这个文件,看到它的内容了。
通过这种方式可以托管任何类型的文件,并且请求不用指定Content-Type,因为会自动识别。
- 托管一个目录
一般情况下,会把静态文件放在一个目录中,比如使用Gin做网站开发的时候,可以把CSS、JS和Image这些静态资源文件都放在一个目录中,然后使用Static方法把整个目录托管,这样就可以自由访问这个目录中的所有文件了。
1
2
3
4
5
|
func main() {
router := gin.Default()
router.Static("/static", "/tmp")
router.Run(":8080")
}
|
Static方法的第一个参数是设置的路由相对路径,第二个参数是本机上静态文件的目录的路径。
- 实现一个FTP服务器
上一节的例子,如果在浏览器里访问http://localhost:8080/static/,会得到404的错误,这是因为Gin做了安全措施,防止第三方恶意罗列获取服务器上的所有文件。
如果需求正好是要搭建一个类似FTP的服务器,就是想把服务器上的文件件共享给其他人使用,比如下载电影等。这时候你就需要一个可以列出目录的功能了,也就是访问http://localhost:8080/static/可以看到/tmp/目录下的所有文件(包括文件夹),点击文件夹还可以展开看到里面的文件和文件夹,选择合适的文件进行下载,这样就是一个完整的FTP服务器了。
1
2
3
4
5
|
func main() {
router := gin.Default()
router.StaticFS("/static1", gin.Dir("/tmp", true))
router.Run(":8080")
}
|
这里的关键点在于gin.Dir函数的第二个参数,true代表可以列目录的意思。
1
2
3
|
// if listDirectory == true, then it works the same as http.Dir() otherwise it returns
// a filesystem that prevents http.FileServer() to list the directory files.
func Dir(root string, listDirectory bool) http.FileSystem
|
现在启动访问http://localhost:8080/static1/就可以看到文件和文件夹列表了,和FTP服务器是类似的。
- 自定义托管内容类型
以上的示例都是托管一个静态文件或者目录,并没有太多的自定义能力,比如设置内容类型,托管一个文件的部分内容等等。
对于这类需求,Gin 提供了 Data方法 来实现,以第一节中的adobegc.log为例:
1
2
3
4
5
6
7
8
|
router.GET("/adobegc.log", func(c *gin.Context) {
    data, err := ioutil.ReadFile("/tmp/adobegc.log")
    if err != nil {
        c.AbortWithError(500, err)
    } else {
        c.Data(200, "text/plain; charset=utf-8", data)
    }
})
|
这个例子实现的效果和上面的是一样的,不一样的是通过 c.Data 这个方法来实现,这个方法有三个参数:
1
|
func (c *Context) Data(code int, contentType string, data []byte)
|
这就为自定义提供了便利,比如可以指定 contentType 和 data内容,这种能力很有用,比如可以把储存在数据库中的图片二进制数据,作为一张图片显示在网站上。
- 功能更强大的Reader托管
除了可以从一个字节数组[]byte中读取数据显示外,Gin还提供了从一个io.Reader中获取数据,并且提供了更强大的自定义能力,它就是DataFromReader方法。
1
|
func (c *Context) DataFromReader(code int, contentLength int64, contentType string, reader io.Reader, extraHeaders map[string]string)
|
从上面的方法签名可以看到自定义的内容:
- 要显示的内容长度
- 内容的类型
- 一个内容源Reader
- 响应的头信息extraHeaders
尤其是自定义的头信息,可以做很多事情,比如缓存等。这个方法的使用比较简单,和上面的Data方法差不多,这里不再举例。