一、内网穿透概述
1.1 内网穿透简述
内网穿透 是一种通过公共网络(例如互联网)连接两个私有网络的技术,用于实现公网与内网之间的通信连接。
当内网中的设备无法直接从公网访问时,内网穿透技术可以通过一些手段,让公网上的设备能够穿透到内网中的设备,建立起通信连接,使得外部用户可以通过互联网访问内部网络中的服务。
1.2 内网穿透的原理
内网穿透的原理可以简单描述如下:
- NAT(网络地址转换):在常见的网络环境中,内网通常由路由器或防火墙等设备进行网络地址转换(NAT),将内网中的私有IP地址转换为公网可路由的IP地址 。这样,内网设备可以通过NAT设备与公网通信(上网),但公网无法直接访问内网设备。
- 内网穿透技术:为了实现内网穿透,需要借助一些特定的技术手段,使公网上的设备能够访问到内网中的设备。常见的穿透技术包括:
- 端口映射(Port Forwarding):通过在路由器上进行端口映射配置,将公网上的某个端口映射到内网中的设备,从而实现对该设备的访问。
- 反向代理(Reverse Proxy):在公网上搭建一个反向代理服务器,将公网请求转发到内网中的设备上。公网设备与反向代理服务器建立连接后,由反向代理服务器将请求转发到内网设备,实现公网访问内网的功能。
- VPN(Virtual Private Network):通过建立VPN连接,将公网和内网连接在一起,使得公网用户可以通过VPN隧道访问内网资源。VPN会创建一个虚拟的私有网络,将公网设备加入到该网络中,使其能够直接访问内网中的设备。
- 云服务:一些云服务提供商提供了内网穿透的解决方案,用户可以通过这些云服务将内网设备暴露到公网上,以实现公网访问内网的需求。
二、内网穿透之Frp
2.1 Frp 内网穿透概述
Frp(Fast Reverse Proxy)是一种流行的内网穿透工具, 采用了 C/S 模式,将服务端 frps 部署在具有公网 IP 的机器上,客户端 frpc 部署在内网或防火墙内的机器上,通过访问暴露在服务器上的端口,反向代理到处于内网的 frpc主机上的服务。 在此基础上,Frp 支持 TCP/STCP, UDP/SUDP, HTTP/HTTPS 等多种协议,提供了加密、压缩,身份认证,代理限速,负载均衡等众多能力。此外,还可以通过 xtcp 实现 P2P 通信。
Frp 实现内网穿透的技术思想如下:
- 反向代理(Reverse Proxy) :Frp利用反向代理的思想,在公共服务器上部署一个中转服务器(即 frps 服务器),外部用户通过该中转服务器与内部网络建立连接。
- 端口映射和流量转发:Frp将外部请求映射到内网机器上的指定端口,然后将流量从公网传输到内网,实现数据传输。
- 心跳检测和保持连接:Frp通过心跳检测机制保持与客户端和服务端之间的稳定连接,确保数据传输的可靠性和稳定性。
Frp 内网穿透技术的优势如下:
- 穿透防火墙和NAT:FRP可以穿透防火墙和NAT设备,使得位于不同网络环境中的主机能够互相通信,解决了企业内外网络隔离的问题。
- 灵活性和易用性:FRP配置简单灵活,支持多种协议(TCP、UDP等),可根据需求灵活配置端口映射和访问控制等参数。
- 安全性:通过加密传输数据、访问控制列表等安全机制,保障数据传输的安全性,防止未经授权的访问。
- 跨平台支持:FRP支持多种操作系统(Windows、Linux、Mac等),可以在不同平台上运行,并且提供了丰富的功能和插件扩展。
- 开源社区支持:FRP是开源项目,拥有活跃的社区支持和更新,用户可以获取最新版本、bug修复以及安全更新。
中文官网:https://gofrp.org/zh-cn/
中文文档:https://gofrp.org/zh-cn/docs/
2.2 Frp 内网穿透 TCP 模式
Frp 的 TCP 代理模式 可以实现将内网主机 sshd 服务 暴露到公网,使得用户可以通过公网访问(连接)内网主机。TCP代理模式架构如下图所示:
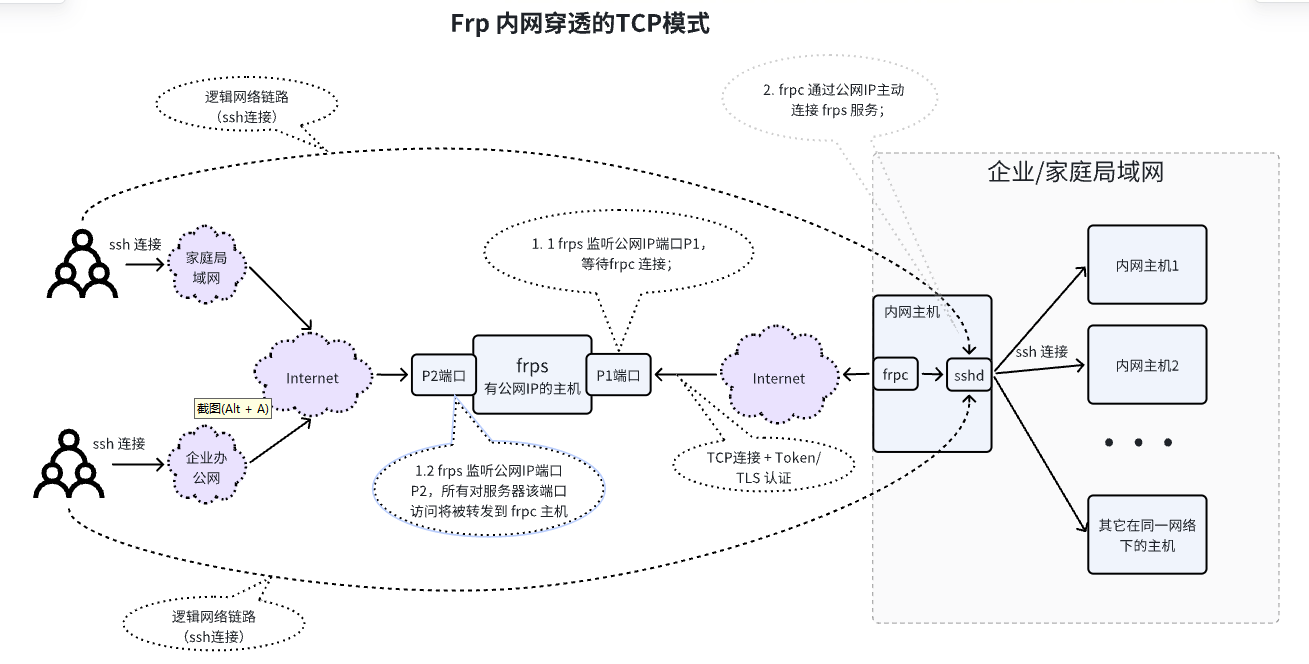
- TCP 代理模式实现 ssh 内网穿透服务 功能实现逻辑概述:
- 在公网主机上部署 frps 服务, 该服务监听 P1 和 P2 两个端口:
- P1端口 接收 frpc 服务连接请求 建立 frps服务主机 到 frpc服务主机 的 TCP层 反向代理;
- P2 端口 接收互联网用户通过 Internet 的访问请求(ssh 连接 请求),并把该请求的数据转发到 与 P1 端口 建立 TCP连接的 frpc 服务主机;
- 在内网目标主机上部署 frpc 服务,该服务主动发起并建立 与 frps 服务 P1端口的 TCP连接,完成身份认证后维持该 TCP 连接,用于接收 frps 转发的 来之 P2端口 到的 ssh 连接请求,并把接收到的 ssh 连接请求转发到本机 sshd 服务;
- 互联网用户 使用 ssh 通过 Internet 连接到 frps 服务 的 P2 端口,frps 将 ssh 连接请求转发到 与 P1 端口建立连接的 frpc 主机,frpc 接收到 ssh 连接请求后将该请求数据转发到 本机的 sshd 服务。
- TCP 代理模式实现 ssh 内网穿透服务 的安全隐患
- frp的 TCP模式 相当于直接把内网设备向公网暴露了一个 TCP端口。任何人/设备都可以通过互联网尝试连接这个端口,这可能会带来很大的安全风险。
2.3 Frp 内网穿透 STCP 模式
为了规避 TCP模式 带来的暴露内网主机端口的安全风险,Frp 提供安全的 TCP 内网代理(STCP代理)模式。
该代理模式要求在被访主机 以及 用户主机上都部署上 Frp 的客户端。被访问的主机所在机器叫做 frpc端(目标服务端),用户主机端叫做 frpv端 (访问端)。
Frp 会在 frpv端 监听一个端口 P2 和 frpc端 的本地服务(如 sshd)端口 P1 做映射。frpv端的用户需要提供相同的 SecretKey 才能连接成功,从而保证安全性。
STCP 代理模式架构如下图所示:
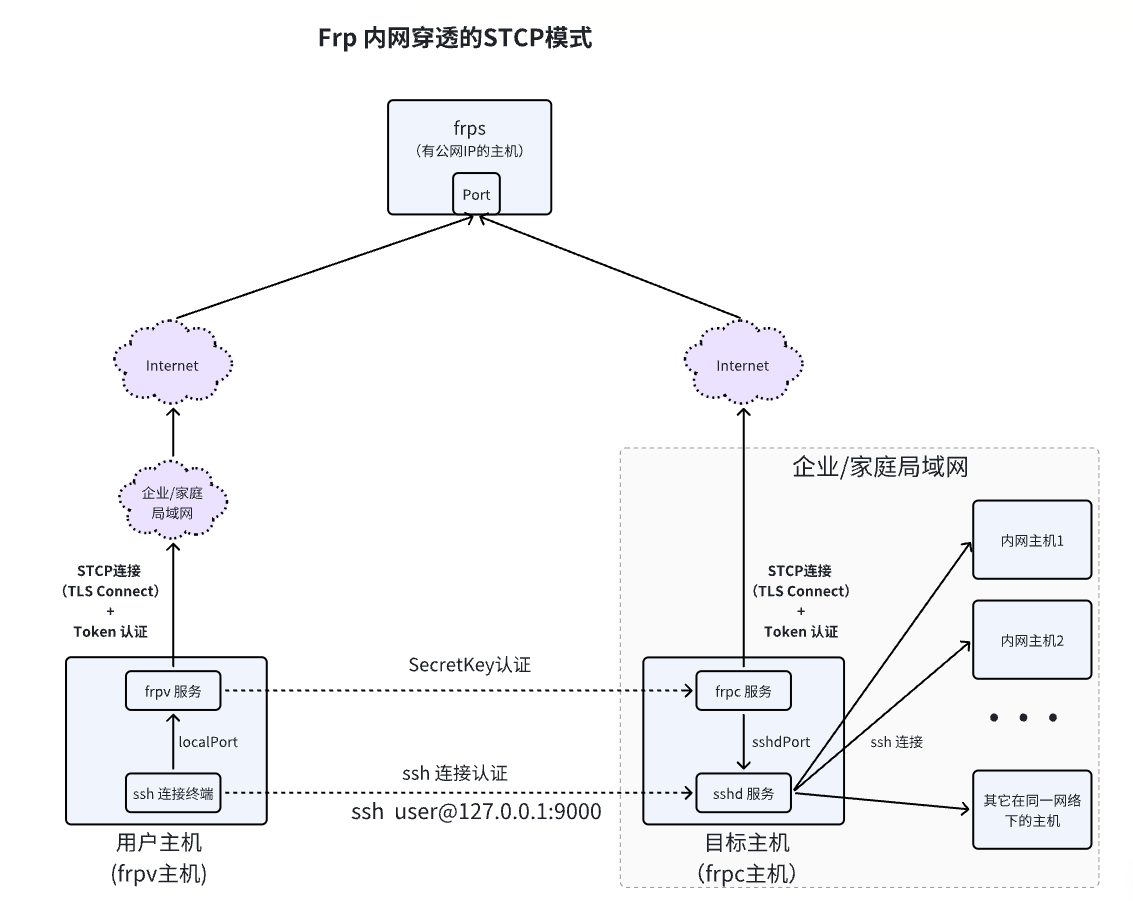
STCP 安全代理模式实现 ssh 内网穿透服务 功能实现逻辑概述:
- 在公网主机上部署 frps 服务 并监听 Port(57022) 端口提供服务转发功能,该服务 可以配置开启基于 Token 和 TLS 的连接认证功能;
- 在目标主机上部署 frpc 服务,frpc 主动与 frps 的 Port(57022)建立 TCP 连接,并 使用 SecretKey 向 frps 注册 一个 stcp 端口映射,这样当有 frpv 使用 相同的 SecretKey 来向 frps 请求建立 端口映射时,frps 将 建立 frpv -> frps -> frpc 的 STCP 端口映射;
- 在户主机上 部署 frpv(与frpc 是同一个程序)服务,该服务 也主动 与 frps 的 Port(57022) 建立 TCP 连接, 并使用 frpc 相同的 SecretKey 请求 frps 为其创建 到 指定 frpc 的 STCP 端口映射,frpv 同时监听 本地(localhost)端口 P1(9000),当接收到 ssh 连接 请求后, 通过前面建立的端口映射 进行转发;
- 用户 使用 ssh 连接 本地主机端口 P1 (ssh user@127.0.0.1:9000),frpv 接收到 ssh 连接请求 后,将转发的 到 frps 服务映射好的 STCP 端口链路中,路由为 : ssh -> frpv -> frps -> frpc -> sshd 到目标主机;
STCP 安全代理模式实现 ssh 内网穿透服务 的安全防护
- frpc/frpv 与 frps 之间的 TCP 连接 采用 TLS + Token认证 的安全连接模式
- frpc 与 frpv 之间使用 SecretKey 经 frps 进行 点对点 的 SecretKey 认证。
三、Frp 内网穿透 STCP 模式 的配置
3.1 frps 配置
file: frps.toml-template
 1
 2
 3
 4
 5
 6
 7
 8
 9
10
11
12
13
14
15
16
17
18
19
20
21
22
23
24
25
26
27
28
29
30
31
32
33
34
35
36
37
38
39
40
41
42
43
44
45
46
47
48
49
50
51
52
53
54
55
56
57
58
59
|
# A literal address or host name for IPv6 must be enclosed
# in square brackets, as in "[::1]:80", "[ipv6-host]:http" or "[ipv6-host%zone]:80"
# For single "bindAddr" field, no need square brackets, like `bindAddr = "::"`.
# frps 服务绑定的 IP 和 监听的 端口
bindAddr = "0.0.0.0"
bindPort = 7000

# Heartbeat configure, it's not recommended to modify the default value
# The default value of heartbeatTimeout is 90. Set negative value to disable it.
# transport.heartbeatTimeout = 90

# Pool count in each proxy will keep no more than maxPoolCount.
transport.maxPoolCount = 5

# transport.tls.force specifies whether to only accept TLS-encrypted connections. By default, the value is false.
# 开启 TLS
transport.tls.force = true

transport.tls.certFile = "frp_install_path/pki/server.crt"
transport.tls.keyFile = "frp_install_path/pki/server.key"
transport.tls.trustedCaFile = "frp_install_path/pki/ca.crt"

# If tcpmuxPassthrough is true, frps won't do any update on traffic.
# tcpmuxPassthrough = false

# console or real logFile path like ./frps.log
log.to = "frp_install_path/log/frps.log"
# trace, debug, info, warn, error
log.level = "info"
log.maxDays = 3
# disable log colors when log.to is console, default is false
log.disablePrintColor = false

# DetailedErrorsToClient defines whether to send the specific error (with debug info) to frpc. By default, this value is true.
detailedErrorsToClient = true

# auth.method specifies what authentication method to use authenticate frpc with frps.
# If "token" is specified - token will be read into login message.
# 设置 frpc 与 frps 之间的认证方式为 token
auth.method = "token"

# auth.additionalScopes specifies additional scopes to include authentication information.
# Optional values are HeartBeats, NewWorkConns.
# auth.additionalScopes 配置需要 frps、frpc 和 frpv 保持一致,否则注册端口映射不成功
auth.additionalScopes = ["HeartBeats", "NewWorkConns"]

# auth token
auth.token = "123456"

# userConnTimeout specifies the maximum time to wait for a work connection.
# userConnTimeout = 10

# Only allow frpc to bind ports you list. By default, there won't be any limit.

# Max ports can be used for each client, default value is 0 means no limit
maxPortsPerClient = 0

# Retention time for NAT hole punching strategy data.
natholeAnalysisDataReserveHours = 168
|
此为 frps 的配置模板,进入 frps 目录后执行 sh reset_cfg_path.sh 如下脚本将正确重置 frps 配置
file: reset_cfg_path.sh
 1
 2
 3
 4
 5
 6
 7
 8
 9
10
11
12
|
#!/bin/bash

frp_path=$(cd $(dirname $0); pwd)

echo "Work dir: ${frp_path}"

frp=frps

sed 's@frp_install_path@'"${frp_path}"'@g' ${frp}.toml-template > ${frp}.toml

echo "Reset config(${frp}.toml) path success."
echo ""
|
3.2 frpc 配置
file: frpc.toml-template
 1
 2
 3
 4
 5
 6
 7
 8
 9
10
11
12
13
14
15
16
17
18
19
20
21
22
23
24
25
26
27
28
29
30
31
32
33
34
35
36
37
38
39
40
41
42
43
44
45
46
47
48
49
50
51
52
53
54
55
56
57
58
59
60
61
62
63
64
65
66
67
68
69
70
71
72
73
74
75
76
77
|
# A literal address or host name for IPv6 must be enclosed
# in square brackets, as in "[::1]:80", "[ipv6-host]:http" or "[ipv6-host%zone]:80"
# For single serverAddr field, no need square brackets, like serverAddr = "::".
# frps 服务端的 IP 和 Port
serverAddr = "公网IP"
serverPort = 7000

# STUN server to help penetrate NAT hole.
# natHoleStunServer = "stun.easyvoip.com:3478"

# Decide if exit program when first login failed, otherwise continuous relogin to frps
# default is true
loginFailExit = true

# console or real logFile path like ./frpc.log
log.to = "frp_install_path/log/frpc.log"
# trace, debug, info, warn, error
log.level = "info"
log.maxDays = 3
# disable log colors when log.to is console, default is false
log.disablePrintColor = false

auth.method = "token"
# auth.additionalScopes specifies additional scopes to include authentication information.
# Optional values are HeartBeats, NewWorkConns.
# auth.additionalScopes 配置需要 frpc 和 frpv 保持一致,否则注册端口映射不成功
auth.additionalScopes = ["HeartBeats", "NewWorkConns"]

# auth token
auth.token = "123456"

# connections will be established in advance, default value is zero
transport.poolCount = 5

# If tcp stream multiplexing is used, default is true, it must be same with frps
# transport.tcpMux = true

# Specify keep alive interval for tcp mux.
# only valid if tcpMux is enabled.
# transport.tcpMuxKeepaliveInterval = 30

# Communication protocol used to connect to server
# supports tcp, kcp, quic, websocket and wss now, default is tcp
transport.protocol = "tcp"

# If tls.enable is true, frpc will connect frps by tls.
# Since v0.50.0, the default value has been changed to true, and tls is enabled by default.
transport.tls.enable = true

transport.tls.certFile = "frp_install_path/pki/clientc.crt"
transport.tls.keyFile = "frp_install_path/pki/clientc.key"
transport.tls.trustedCaFile = "frp_install_path/pki/ca.crt"
transport.tls.serverName = "localhost"

# If the disableCustomTLSFirstByte is set to false, frpc will establish a connection with frps using the
# first custom byte when tls is enabled.
# Since v0.50.0, the default value has been changed to true, and the first custom byte is disabled by default.
# transport.tls.disableCustomTLSFirstByte = true

# Heartbeat configure, it's not recommended to modify the default value.
# The default value of heartbeatInterval is 10 and heartbeatTimeout is 90. Set negative value
# to disable it.
# transport.heartbeatInterval = 30
# transport.heartbeatTimeout = 90

[[proxies]]
name = "secret_tcp"
# If the type is secret tcp, remotePort is useless
# Who want to connect local port should deploy another frpc with stcp proxy and role is visitor
type = "stcp"
# secretKey is used for authentication for visitors
secretKey = "abcdef"
localIP = "127.0.0.1"
localPort = 22
# If not empty, only visitors from specified users can connect.
# Otherwise, visitors from same user can connect. '*' means allow all users.
allowUsers = ["*"]
|
此为 frpc 的配置模板,进入 frpc 目录后执行 sh reset_cfg_path.sh 如下脚本将正确重置 frpc 配置
 1
 2
 3
 4
 5
 6
 7
 8
 9
10
11
12
13
|
# file: reset_cfg_path.sh
#!/bin/bash

frp_path=$(cd $(dirname $0); pwd)

echo "Work dir: ${frp_path}"

frp=frpc

sed 's@frp_install_path@'"${frp_path}"'@g' ${frp}.toml-template > ${frp}.toml

echo "Reset config(${frp}.toml) path success."
echo ""
|
3.3 frpv 配置
file: frpv.toml-template
 1
 2
 3
 4
 5
 6
 7
 8
 9
10
11
12
13
14
15
16
17
18
19
20
21
22
23
24
25
26
27
28
29
30
31
32
33
34
35
36
37
38
39
40
41
42
43
44
45
46
47
48
49
50
51
52
53
54
55
56
57
58
59
60
61
62
63
64
65
66
67
68
69
70
71
72
73
74
75
76
77
|
# A literal address or host name for IPv6 must be enclosed
# in square brackets, as in "[::1]:80", "[ipv6-host]:http" or "[ipv6-host%zone]:80"
# For single serverAddr field, no need square brackets, like serverAddr = "::".
# frps 服务端的 IP 和 Port
serverAddr = "公网IP"
serverPort = 7000

# STUN server to help penetrate NAT hole.
# natHoleStunServer = "stun.easyvoip.com:3478"

# Decide if exit program when first login failed, otherwise continuous relogin to frps
# default is true
loginFailExit = true

# console or real logFile path like ./frpv.log
log.to = "frp_install_path/log/frpv.log"
# trace, debug, info, warn, error
log.level = "info"
log.maxDays = 3
# disable log colors when log.to is console, default is false
log.disablePrintColor = false

auth.method = "token"
# auth.additionalScopes specifies additional scopes to include authentication information.
# Optional values are HeartBeats, NewWorkConns.
auth.additionalScopes = ["HeartBeats", "NewWorkConns"]

# auth token
auth.token = "123456"

# connections will be established in advance, default value is zero
transport.poolCount = 5

# If tcp stream multiplexing is used, default is true, it must be same with frps
# transport.tcpMux = true

# Specify keep alive interval for tcp mux.
# only valid if tcpMux is enabled.
# transport.tcpMuxKeepaliveInterval = 30

# Communication protocol used to connect to server
# supports tcp, kcp, quic, websocket and wss now, default is tcp
transport.protocol = "tcp"

# If tls.enable is true, frpv will connect frps by tls.
# Since v0.50.0, the default value has been changed to true, and tls is enabled by default.
transport.tls.enable = true

transport.tls.certFile = "frp_install_path/pki/client.crt"
transport.tls.keyFile = "frp_install_path/pki/client.key"
transport.tls.trustedCaFile = "frp_install_path/pki/ca.crt"
transport.tls.serverName = "localhost"

# If the disableCustomTLSFirstByte is set to false, frpv will establish a connection with frps using the
# first custom byte when tls is enabled.
# Since v0.50.0, the default value has been changed to true, and the first custom byte is disabled by default.
# transport.tls.disableCustomTLSFirstByte = true

# Heartbeat configure, it's not recommended to modify the default value.
# The default value of heartbeatInterval is 10 and heartbeatTimeout is 90. Set negative value
# to disable it.
# transport.heartbeatInterval = 30
# transport.heartbeatTimeout = 90

# frpv role visitor -> frps -> frpc role server
[[visitors]]
name = "secret_tcp_visitor"
type = "stcp"
# the server name you want to visitor
serverName = "secret_tcp"
secretKey = "abcde"
# connect this address to visitor stcp server
bindAddr = "127.0.0.1"
# bindPort can be less than 0, it means don't bind to the port and only receive connections redirected from
# other visitors. (This is not supported for SUDP now)
# frpv 主机本地代理端口
bindPort = 9000
|
此为 frpv 的配置模板,进入 frpv 目录后执行 sh reset_cfg_path.sh 如下脚本将正确重置 frpv 配置
 1
 2
 3
 4
 5
 6
 7
 8
 9
10
11
12
13
|
# file: reset_cfg_path.sh
#!/bin/bash

frp_path=$(cd $(dirname $0); pwd)

echo "Work dir: ${frp_path}"

frp=frpv

sed 's@frp_install_path@'"${frp_path}"'@g' ${frp}.toml-template > ${frp}.toml

echo "Reset config(${frp}.toml) path success."
echo ""
|
四、 基于 IP 地址的自签发 SSL/TLS 证书
4.1 tmp-openssl.cnf
file: tmp-openssl.cnf
 1
 2
 3
 4
 5
 6
 7
 8
 9
10
11
12
13
14
15
16
17
18
19
20
21
22
23
|
[ ca ]
default_ca = CA_default
[ CA_default ]
x509_extensions = usr_cert
[ req ]
default_bits        = 2048
default_md          = sha256
default_keyfile     = privkey.pem
distinguished_name  = req_distinguished_name
attributes          = req_attributes
x509_extensions     = v3_ca
string_mask         = utf8only
[ req_distinguished_name ]
[ req_attributes ]
[ usr_cert ]
basicConstraints       = CA:FALSE
nsComment              = "OpenSSL Generated Certificate"
subjectKeyIdentifier   = hash
authorityKeyIdentifier = keyid,issuer
[ v3_ca ]
subjectKeyIdentifier   = hash
authorityKeyIdentifier = keyid:always,issuer
basicConstraints       = CA:true
|
4.2 为IP签发SSL/TLS证书
签发证书的shell命令:
 1
 2
 3
 4
 5
 6
 7
 8
 9
10
11
12
13
14
15
16
17
18
19
20
21
22
23
24
25
26
27
28
29
30
31
32
33
34
35
36
37
38
39
40
41
42
43
44
45
46
47
48
49
50
51
52
|
#!/bin/bash

# 1. 创建根证书的私钥
# openssl genpkey -algorithm RSA -out ca.key -pkeyopt rsa_keygen_bits:2048
openssl genrsa -out ca.key 2048

# 2. 创建根证书的自签名请求, 把 CN 处的 IP 地址替换为要签发的 IP 地址
# openssl req -x509 -new -nodes -key ca.key -subj "/CN=example.ca.com" -days 5000 -out ca.crt
openssl req -x509 -new -nodes -key ca.key -subj "/C=CN/ST=Yunnan/L=Kunming/O=Organization/CN=IP:127.0.0.1,IP:192.168.10.11,IP:12.11.134.13" -days 365 -out ca.crt

# 3. 创建 服务端 基于 IP 的 SSL证书的 私钥
openssl genrsa -out server.key 2048

# 4. 创建基于IP的SSL证书的签名请求,把 CN 和 subjectAltName 处的 IP 地址替换为要签发的 IP 地址
openssl req -new -sha256 -key server.key \
    -subj "/C=CN/ST=Yunnan/L=Kunming/O=Organization/CN=IP:127.0.0.1,IP:192.168.10.11,IP:12.11.134.13" \
    -reqexts SAN \
    -config <(cat tmp-openssl.cnf <(printf "\n[SAN]\nsubjectAltName=DNS:localhost,IP:127.0.0.1,IP:127.0.0.1,IP:192.168.10.11,IP:12.11.134.13")) \
    -out server.csr

# 5. 使用根证书签发基于IP的SSL证书, 把 subjectAltName 处的 IP 地址替换为要签发的 IP 地址
openssl x509 -req -days 365 -sha256 \
	-in server.csr -CA ca.crt -CAkey ca.key -CAcreateserial \
	-extfile <(printf "subjectAltName=DNS:localhost,IP:127.0.0.1,IP:192.168.10.11,IP:12.11.134.13") \
	-out server.crt

# 6. 创建 客户端 基于 IP 的 SSL证书的 私钥
openssl genrsa -out client.key 2048

# 7. 创建基于IP的SSL证书的签名请求,把 CN 和 subjectAltName 处的 IP 地址替换为要签发的 IP 地址
openssl req -new -sha256 -key client.key \
    -subj "/C=CN/ST=Yunnan/L=Kunming/O=Organization/CN=IP:192.168.10.11,IP:12.11.134.13" \
    -reqexts SAN \
    -config <(cat tmp-openssl.cnf <(printf "\n[SAN]\nsubjectAltName=DNS:localhost,IP:127.0.0.1,IP:192.168.10.11,IP:12.11.134.13")) \
    -out client.csr

# 8. 使用根证书签发基于IP的SSL证书,把 CN 和 subjectAltName 处的 IP 地址替换为要签发的 IP 地址
openssl x509 -req -days 365 -sha256 \
    -in client.csr -CA ca.crt -CAkey ca.key -CAcreateserial \
	-extfile <(printf "subjectAltName=DNS:localhost,IP:127.0.0.1,IP:192.168.10.11,IP:12.11.134.13") \
	-out client.crt

# openssl x509 -req -in root.csr -signkey root.key -out root.crt -days 3650

# 4. 创建基于IP的SSL证书的私钥
# openssl genpkey -algorithm RSA -out server.key -pkeyopt rsa_keygen_bits:2048

# 5. 创建基于IP的SSL证书的签名请求
# openssl req -new -key server.key -out server.csr -subj "/C=US/ST=State/L=Locality/O=Organization/CN=ip:192.168.1.1"

# 6. 使用根证书签发基于IP的SSL证书
# openssl x509 -req -in server.csr -CA root.crt -CAkey root.key -CAcreateserial -out server.crt -days 3650 -extfile <(printf "subjectAltName=IP:192.168.1.1")
|
该命令在 shell 脚本脚本中执行会报语法错误, 直接逐条 copy 到 shell 命令行执行即可在当前目录生成证书等文件。
五、 Windows 下设置 Frp 服务后台运行
5.1 设置 Frp 服务后台运行
本文 以 frpv 为例, frpc、frps 与 frpc 相同。通常情况下,frpc/frps 都部署在linux下。
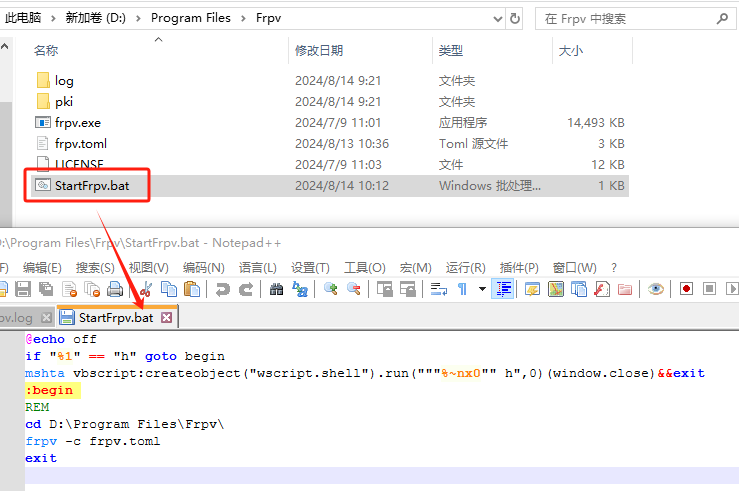
Step 1: 在 frpv 安装目录下新建 StartFrpv.bat 文件, 输入如下代码保存后退出
1
2
3
4
5
6
7
8
|
@echo off
if "%1" == "h" goto begin
mshta vbscript:createobject("wscript.shell").run("""%~nx0"" h",0)(window.close)&&exit
:begin
REM
cd D:\Program Files\Frpv\
frpv -c frpv.toml
exit
|
如下图
Step 2: 鼠标右键点击 StartFrpv.bat 文件 选择 “创建快捷方式” 创建 StartFrpv.bat 的快捷方式,创建好后可以重命名快捷方式文件,比如重命名为 FrpVisiter(可以不要后缀名)。
Step 3: 为创建的 快捷方式 更换 icon 图标,鼠标右键点击 快捷方式,依次点击 ”属性“ -> “快捷方式” 选项卡 -> “更改图标(C)…” 点击选择想要设置的 图标,点击 “确定” -> “应用/确定” 即可。
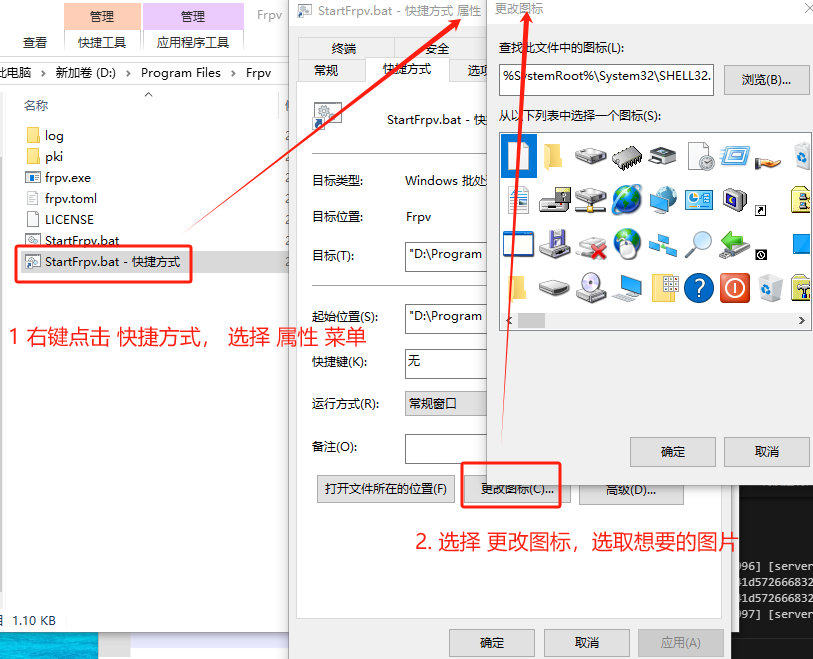
Step 4: 把快捷方式拖到 桌面 即可点击快捷方式在后台 启动 frpv 服务。
5.2 设置 Frp 服务后台运行唯一进程
在 frpv 安装目录下新建 StartFrpv.bat 文件, 输入如下代码保存后退出
 1
 2
 3
 4
 5
 6
 7
 8
 9
10
11
12
13
14
15
16
17
18
19
20
21
22
23
24
25
26
27
28
|
@echo off
if "%1" == "h" (
	goto begin
)
mshta vbscript:createobject("wscript.shell").run("""%~nx0"" h",0)(window.close) && ^
echo frpv is already running. && ^
tasklist | findstr /i "frpv.exe" && ^
timeout /t 3 /nobreak && ^
exit

:begin
	:: 检查frpc进程是否已在运行
	tasklist | findstr /i "frpv.exe" > nul
	if errorlevel 1 (
		echo Start frpv now.
		REM
		cd D:\Program Files\Frpv\
		frpv -c frpv.toml
		if errorlevel 1 (
			echo Failed to start frpv.
			timeout /t 3 /nobreak
			exit /b 1
		)
	)

	tasklist | findstr /i "frpv.exe"
	timeout /t 3 /nobreak
exit
|
 1
 2
 3
 4
 5
 6
 7
 8
 9
10
11
12
13
14
15
16
17
18
19
20
21
22
23
24
25
26
27
28
29
30
|
@echo off
if "%1" == "h" (
	goto begin
)
mshta vbscript:createobject("wscript.shell").run("""%~nx0"" h",0)(window.close) && ^
echo frpv is already running. && ^
tasklist | findstr /i "frpv.exe" && ^
timeout /t 3 /nobreak && ^
exit

:begin
	:: 检查frpc进程是否已在运行
	tasklist | findstr /i "frpv.exe" > nul
	if errorlevel 1 (
		echo Start frpv now...
		REM
		cd D:\Program Files\Frpv\
		start /B frpv -c frpv.toml

		tasklist | findstr /i "frpv.exe" > nul
		if errorlevel 1 (
			echo Failed to start frpv...
			timeout /t 3 /nobreak
			exit /b 1
		)
		tasklist | findstr /i "frpv.exe"
		echo Start frpv success...
	)
	timeout /t 3 /nobreak
exit /b 0
|
其它步骤与 5.1 小节相同。
5.3 退出 frpv 服务
要退出 frpv 服务, 需要在 windows 任务管理器中找到 frpv 进程 并将其 “结束” 即可。